Category Archives: HowTo

How To: Decode LogonHours Attribute

In this post we look at the LogonHours attribute, which is used to restrict when a user is allowed to logon, and how to decode this attribute.

The LogonHours attribute has a octet data type that is used to store a 21 byte value which defines when a user is allowed to logon, outside of these hours the user will receive the following error message when they try to logon:

This may be seen as one of the following errors:

Error 1327: Account restrictions are preventing this user from signing in. For example: blank passwords aren't allowed, sign-in times are limited, or a policy restriction has been enforced

Error 1328: Your account has time restrictions that keep you from signing in right now.

The LogonHours attribute is used to define when a user is permitted to log on, it uses the 21 byte data structure to represent the day’s of the week.  It uses three bytes to represent each day of the week. The three bytes represent the hours of the day, the diagram below shows the mapping of the bytes to days and hours.

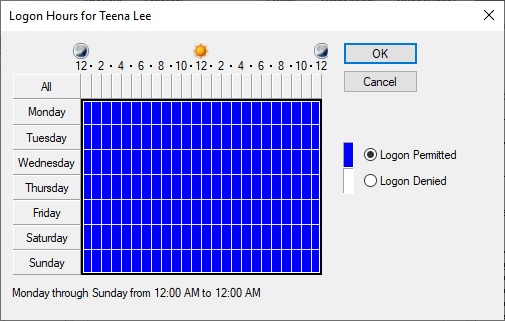
The user's permitted logon hours are displayed in the properties of the user in Active Directory User and Computers under the Account tab. 

One of the challenges with decoding the LogonHours attribute is that the data is saved based on UTC, as shown in the mapping above, however, Active Directory Users and Computers will display the details based on the local time zone of the computer running ADUC, and will adjust the times based on the time zone offset.   Below we can see that the left hand picture shows the Logon Hours on a computer with the time zone set to UTC, while the right shows the same details but the computer has a time zone set to Melbourne (UTC+10).

The time zone of the Domain Controller, which authenticates the user will be used to determine, if they can log on, or not.

This is the value of the attribute based on the permitted logon hours of Monday to Friday 6am to 7pm on a machine with time zone set to UTC, as shown in the left picture above.

DN> CN=Teena Lee,OU=Domain Users,DC=w2k12,DC=local
> logonHours: 00 00 00 C0 FF 03 C0 FF 03 C0 FF 03 C0 FF 03 C0 FF 03 00 00 00

We can see that this aligns with the mapping above, with the Sunday and Saturday bytes set to zeros. Next, this is the value set for the same time window on a machine with the time zone set to Melbourne (UTC+10)

DN> CN=Teena Lee,OU=Domain Users,DC=w2k12,DC=local
> logonHours: 00 00 F0 FF 01 F0 FF 01 F0 FF 01 F0 FF 01 F0 FF 01 00 00 00 00

The Sunday bytes now have values set, as the time was adjusted by -10 hours before it was saved. Next, this is the value set for the same time window on a machine with the time zone set to Pacific Time (UTC-10)

DN> CN=Teena Lee,OU=Domain Users,DC=w2k12,DC=local
> logonHours (BIN): 00 00 00 00 C0 FF 07 C0 FF 07 C0 FF 07 C0 FF 07 C0 FF 07 00 00 

With this one, the hours data is now written into the Saturday bytes due to the UTC-10 offset.

The LogonHours functionality is limited to a single time zone, and can potentially cause logon issues, if a user travels, or authenticates to a Domain Controller which has a different time zone set.

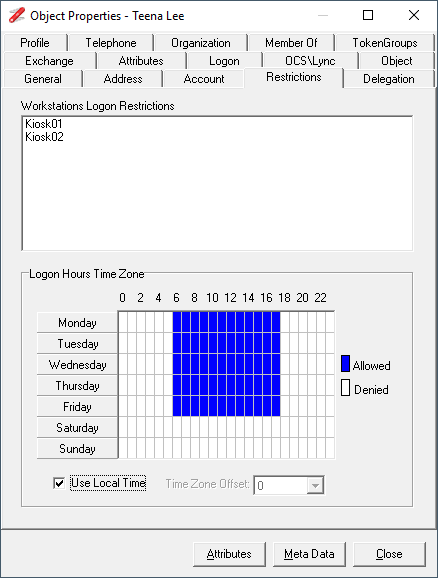
The AD Properties dialog in NetTools has a Restrictions tab which displays the Logon Hours, by default it will use the local time zone to display this information, however, there is an option to allow you to manually adjust the time zone to see the impact the user's ability to logon.

Below is the code used to display the LogonHours in NetTools, the function is called for each square in the grid, the ACol and ARow defining the square that is being queried, the function will colour the square blue, if the LogonHour is set.  The function also automatically adjusts the LogonHours based on the local or user selected time zone.

void dgHoursDrawCell(TObject *Sender, int ACol, int ARow, TRect &Rect, TGridDrawState State)
{
int Index, Col,Row, Mask;
int Val, Bias;

   // use Col and Row to reflect tz offset
   Col = ACol;
   Row = ARow;

   // change start of week to Monday
   if (Row==6){
      Row = 0;
   } else {
      Row++;
   }

   if (chkLocalTime->Checked){
      Bias = tz.Bias/60;  // get local time zone, tz populated when form is loaded
   } else {
      try {
          Bias = StrToInt(cmbTZOffset->Text);  // get user selection
      }
      catch(...){
          Bias = 0;
      }
   }

   Col += Bias;  // add time zone offset

   if (Col > 23) {  // rap pointer to start of next day
      Row++;
      Col -= 24;
   }

   if (Col < 0) {  // rap pointer to end of the previous day
      Row--;
      Col += 24;
   }

   if (Row > 6) Row = 0; // rap pointer to valid data
   if (Row < 0) Row = 6;

   if (Col >=0 && Col <=7) Index=0;  // select the correct hours offset bytes
   if (Col >=8 && Col <=15) Index=1;
   if (Col >=16 && Col <=23) Index=2;

   Index += (3 * Row);  // get correct byte
   Mask = 0x1 << (Col % 8);  // create bit mask for hour based on col number

   Val = HourBuffer[Index] & Mask;  // apply mask to check if set

   if (Val){  // Val is non zero set square to blue
       dgHours->Canvas->Brush->Color = clBlue;
   } else {
       dgHours->Canvas->Brush->Color = clWhite;
   }

   dgHours->Canvas->FillRect(Rect);  // draw the square

}


How To: Dump the Active Directory Database

Sometimes when troubleshooting complex issues it can be useful to dump the contents of the AD database, this can then be used to confirm an object exists, or to retrieve the DNT of an object, which will enable other troubleshooting activities, or just being a bit geeky and wanting to look under the hood.

In this post we will be looking at the RootDSE Modify Operations.  There are a number of RootDSE Modify Operations that are available which provide advanced operations on the domain controllers.  The full list of available modifiers is available here.

We will be looking at the DumpDatabase operator which allows us to dump the contents of the AD to a single text file.  The dump file will be written to the NTDS folder on the domain controller.  By default this is %systemroot%\NTDS with the file name of NTDS.dmp.

Note: as this is going to dump every object in the AD database, make sure you have sufficient space available on the volume hosting the NTDS directory on the selected domain controller before running this query.

By default the dump file contains the following fields:

DNT
PDNT
CNT
NCDNT
OBJ
DelTime
RecTime
INST
RDNTyp
RDN

We can also specify additional attributes to be included in the dump file, however some security sensitive fields can't be included i.e. passwords.  We are going to use one of the NetTools predefined queries to complete this task.  This task can be completed on the domain controller itself or executed remotely, you just need domain admin rights on the domain controller to run the query.

In NetTools select the LDAP Search option in the left hand pane under the LDAP section

As the AD database dump query is an update query we need to complete a few extra steps to run the query:

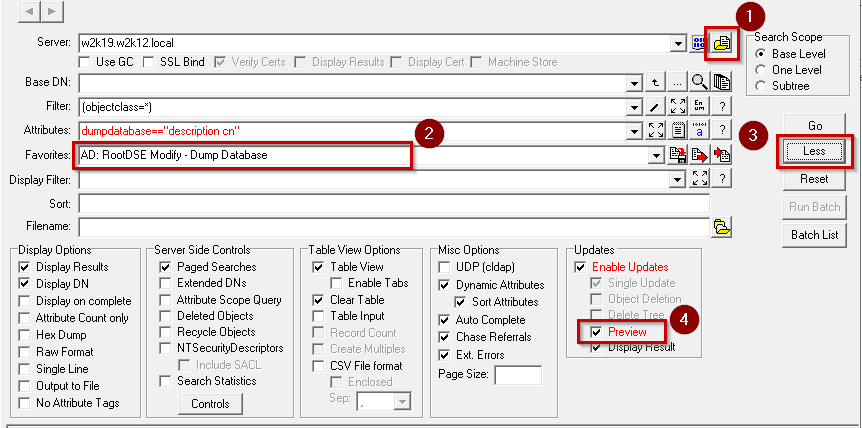
      1. Click on the Populate button
      2. Select the AD: RootDSE Modify - Dump Database from the list of Favorites
      3. Make sure that the BaseDN field is blank, to write to the RootDSE
      4. Click on the More button to display the more options
      5. Uncheck the Preview option
      6. Click Go
      7. Confirm that you want to run the query

Once the query is complete the ntds.dmp will be created in the NTDS directory on the domain controller specified in the Server field. The query is configured to include the description and cn attributes in the dump file, you can specify additional attributes if required, the entry in the speech marks on the Attributes field needs to be updated with a space-separated list of attributes.  If a security sensitive attribute is specified the dump file will contain an error message that the attribute was not found.

One of the limitations of the database dump, is that it will limit the number of characters that are returned per field, so if you are trying to dump the contents of a long binary field i.e. NTSecurityDescriptor the field will be truncated.

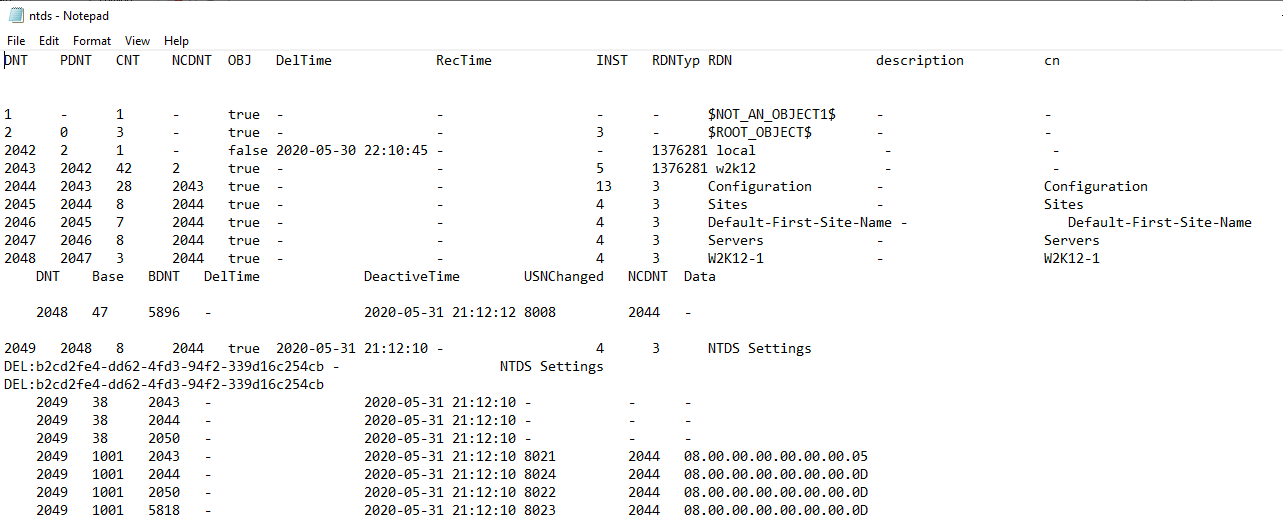
Here is a sample of the database dump:

How To: Retrieve BitLocker Passwords

If you have configured BitLocker to store the recovery keys in AD, you can use NetTools to retrieve the BitLocker Recovery Key.  With NetTools the process to retrieve the recovery key is really simple.

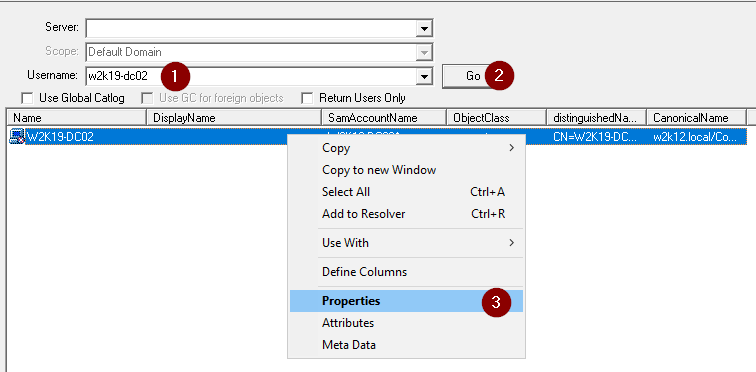
Select the User - Search option in the left hand pane and make sure that the Return Users Only is deselected, and then complete the following steps:

  1. Enter the name of the computer
  2. Click Go
  3. Open the AD Properties for the computer

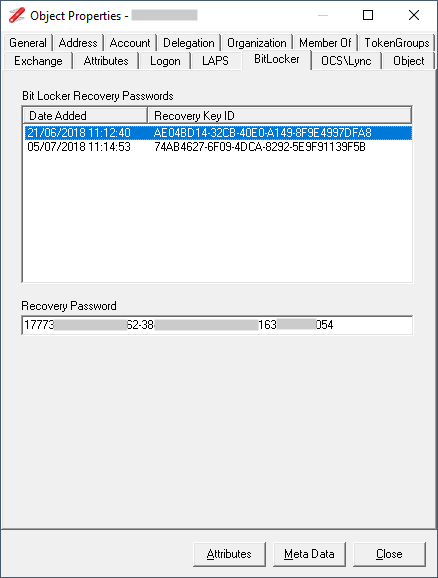
Select the BitLocker tab

Select the Recovery Key ID that is displayed on the BitLocker Recovery screen

Note: the BitLocker tab will only be displayed if msFVE-RecoveryInformation object exist on the computer object and you have the rights to read the object 

How To: Retrieving gMSA Password Details

Group Managed Service Account provide accounts that automatically manage password changes, for more details see this article.

This article covers how to use NetTools to view the details of the Group Managed Service Accounts (gMSA) and also view the current and previous password for the accounts.  The gMSAs are stored in the domain partition in the Managed Service Accounts OU.   The Easiest way to retrieve the password is to use the AD Properties dialog, which allows you to copy the password to the clipboard, however to be able to view the password the account retrieving the password must be specified in the msDS-GroupMSAMembership attrtibute of the Group Managed Service Account.

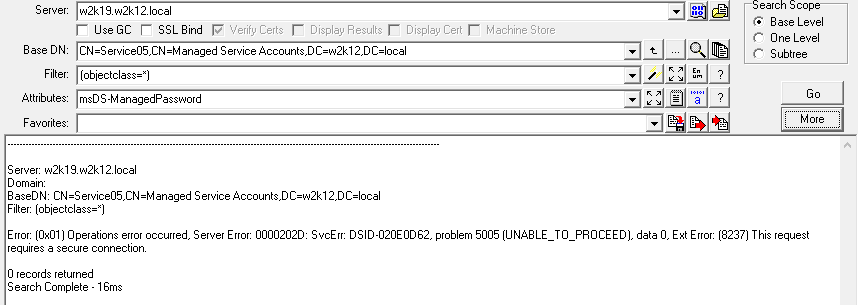
The details in the Password section of the dialog are stored in the msDS-ManagedPassword and msDS-ManagedPasswordId attributes of the object, these can be returned in LDAP Search, however, it does require a specific setup of LDAP Search to return the details as they are protected attributes.

If you create a basic LDAP query you will receive the following error:

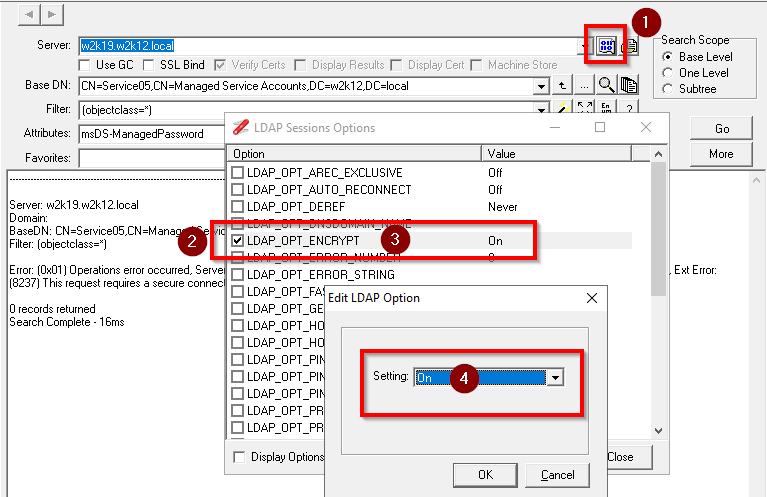
In order to retrieve the password details the connection must be encrypted for the attribute details to be return. To encrypt the connection you must use the LDAP Session Options to enable encryption.  The screenshot below shows the steps to complete the configuration.

  1. Click on the Session Options buttons at the end of the server field
  2. Check the tick box for the LDAP_OPT_ENCRYPT option
  3. Double click on the item to configure the option
  4. Change the setting to On and click OK and close the Session Options dialog

Once the Session Option are configured and encryption is enabled on the connection the details of the attribute are returned.

How To: Troubleshoot AD LDAPS Connection Issues

In this article we cover how to troubleshoot bind issues when connecting to Active Directory using LDAPS.  Typically when a LDAPS connection fails, very little information is provided on the reason for the failure. We will look at using NetTools to help troubleshoot the bind process and identify the reason for the LDAPS bind failure.

There are a few troubleshooting options available, including bypassing the standard certificate revocation process, display the certificate chain with the details of the revocation process and finally displaying the certificate that is installed on the servers used for the connection.

We will use the LDAP Search option in NetTools to test the LDAPS connection. For details on the SSL option see here.

Troubleshooting Steps

    Check a Certificate is Installed

    First, we want to confirm that there is a certificate installed on the domain controller and its being used for the LDAPS.  These tests can be performed remotely or on the domain controller being tested.

    In the server field enter the FQDN of the domain controller, and then select the SSL Bind option, port 636 will be appended to the end of the server name, you will then need to uncheck the Verify Certs and click Go.

    If the connection works and there are no bind errors are returned, then a certificate is installed on the domain controller and Active Directory is using it for LDAPS.

    If you do receive a connection failure error:


    Here are a few checks to determine why the connection failed, or the certificate is not being used.

        • Check name resolution, and the FQDN can be resolved; see DsGetDCName
        • Use the DC Resolution Port Scan option to confirm the port is not blocked
        • On the domain controller, check the Directory Services event log for event id 1220, Source: ActiveDirectory_DomainService, which means that AD was unable to find a suitable certificate to use
        • To confirm that a certificate is available, open MMC on the domain controller, add the Certificates snap-in, select Service Account, and select Active Directory Domain Services. Check under the NTDS\Personal, Certificates and confirm that a certificate is listed
        • If the certificate exists:
              • Check the certificate has the private key
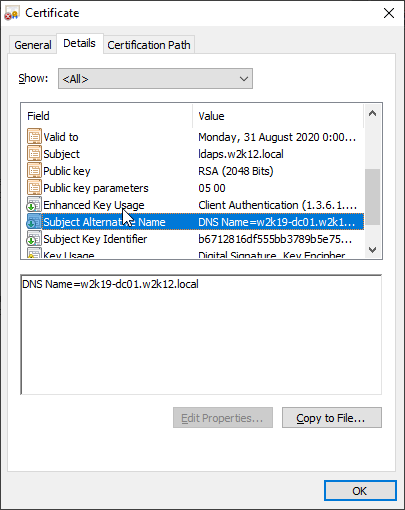
              • Confirm that the Enhanced Key Usage includes Server Authentication (1.3.6.1.5.5.7.3.1)
              • Open the certificate and confirm on the Certification Path tab that the certificate is trusted
        • If no certificate is listed, check your certificate delivery mechanism or manually install a suitable certificate
        • Try disabling the local firewall in case it's blocking the LDAPS connection on port 636
        • Check for Event ID 36874, source schannel on server, "An SSL connection request was received from a remote client application, but none of the cipher suites supported by the client are supported by the server. The SSL connection request has failed." Check that matching ciphers are available - https://learn.microsoft.com/en-us/windows-server/security/tls/tls-registry-settings?tabs=diffie-hellman

    Verify the Certificate

    If the first test worked, then we now repeat the test but with the Verify Certs option selected; this time, the standard Windows certificate revocation process will check the certificate; if this fails, then the connection will also fail. Select Verify Certs and click Go.

    2020-08-30 21_56_43-192.168.1.245 - Remote Desktop Connection

    If you receive the following error, Error: ldap_sslinit failed with error: Error: (0x51) Cannot contact the LDAP server, then the Windows revocation process has identified an issue with the certificate and this has caused the connection to fail.

    Common Certificate Issues

    To help identify what has caused the issue with the certificate, if we select the select the Display Results option, which will display the results of certificate revocation process.

    2020-09-01 12_52_48-192.168.1.245 - Remote Desktop Connection

    Here are a couple of common examples of the errors that can occur.  In these examples the test domain controller has a self-signed certificate and means only one certificate is shown in the certificate chain in the examples.  If your domain controller has a certificate that has been issued by a root CA or an intermediate CA, your certificate chain will have multiple certificates, in this case each of these would be display and tested.  At the end of the certificate chain output if an issue has been found, an ERR: message will be displayed.

    FQDN of the server doesn’t match the certificate

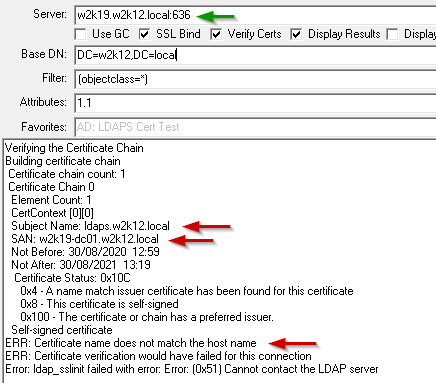
    In this example the server name that has been entered does not match the subject or SAN, in the output the subject and SAN are displayed and an ERR message is returned stating that Certificate name does not match the host name

    Multiple Certificate Errors

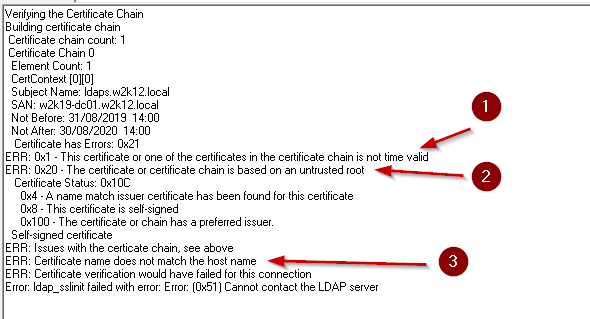
    In this example the certificate chain has three errors: 1- the certificate has expired, 2 – the certificate is not trusted, 3 – the entered server name does not match the subject or SAN in the certificate

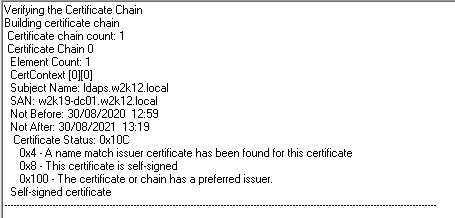
    This is output for a certificate that has passed the certificate revocation process

    Display the Certificate

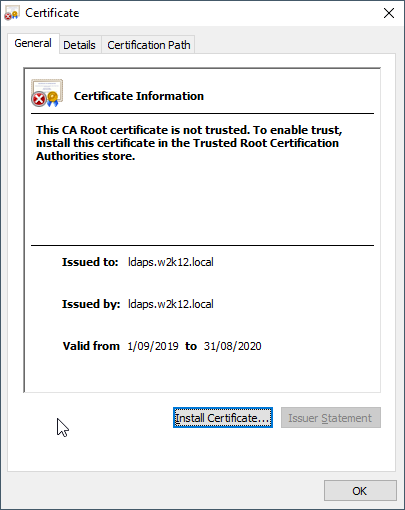
    We also have the option to display the certificate in the normal Certificate dialog, by selecting the Display Cert option, the certificate will be displayed, and we can look at the additional properties of the certificate. NetTools will pause until the certificate dialog is closed.

    In the dialog you can also confirm that the certificate is trusted by the local machine by viewing the Certification Path tab.

    During a logon attempt, the user’s security context accumulated too many security IDs.

    This error occurs when the user's access token exceeds 1015 entries, and at which point the user is blocked from logging on with the above error.  The user’s access token contains an entry for each group the user is a member of, either directly or through nested groups. On top of the entries that are added by group membership, a number of additional entries are added by the system.

    There are a number of reasons that can cause this issue, the two most common are nested groups and migration or more specifically the use of SID History. 

    A complex nested group configuration can cause the number of groups assigned to the increase very quickly.  Due to the nesting, the user could only be a member of handful of groups but due to the nesting the actual number of SIDs in the user’s access token can exceed 1015 entries.  

    The other common cause of this issue is a domain migration using SID History, when SID History is used the user’s access token can double in size, so a user who’s access token contains only 600 groups before migration, it can exceed the 1015 limit post migration, preventing the user from logging on.

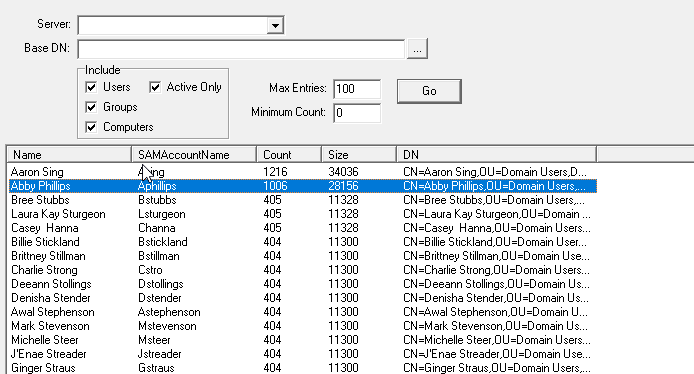
    The Token Size option in NetTools allows you to scan domain and report the number of SIDs in the user’s access token. See Token Size.  This report can be tailored to report on specific objects, i.e. trying to find groups that have a high number of nested groups.

    The screenshot below shows that Aaron's access token has exceed the 1015 limit and will not be able to log on. While Abby has only 1006 SID in her access token, and it will depend on the number of additional SIDs that are added to her access token by the workstation when she logs on, which will determine if she will see the error or not.

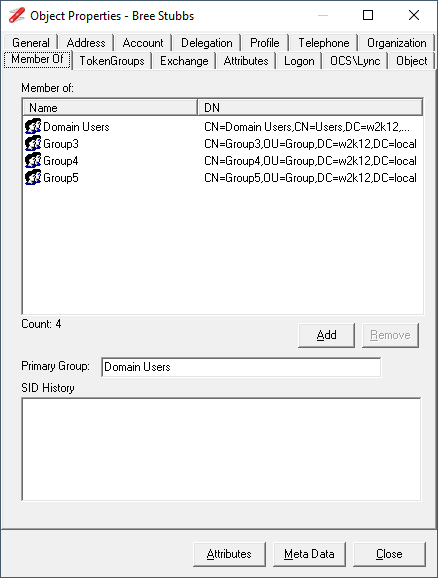
    Bree from the screenshot above, is shown as having 405 SIDs in her access token, looking at the memberof details of her account it shows that she is only a member of 4 groups, nearly all the SIDs are coming from nested groups.

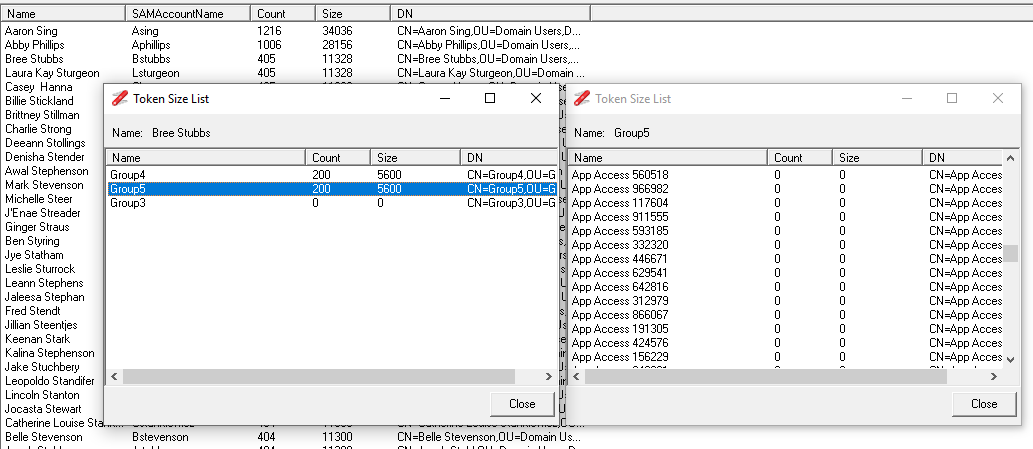
    If we use the Display SID Inheritance option from the context menu on her account in the list, we can see the high SID count is a result of Group4 and Group5, both of which have 200 nested groups.  Obviously this is a test environment and in a production environment the number of groups and their distribution will be different, but from the Token Size List dialog we can see which groups are causing the problem, we can also drill down further by double clicking on an entry in the list, which will display the SID Inheritance for that item, in this case Group5.

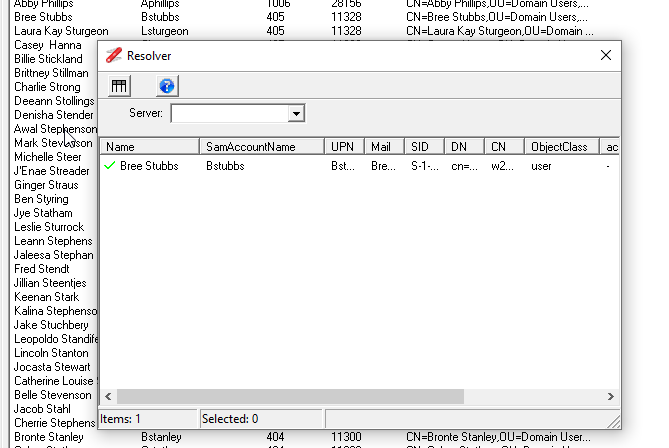
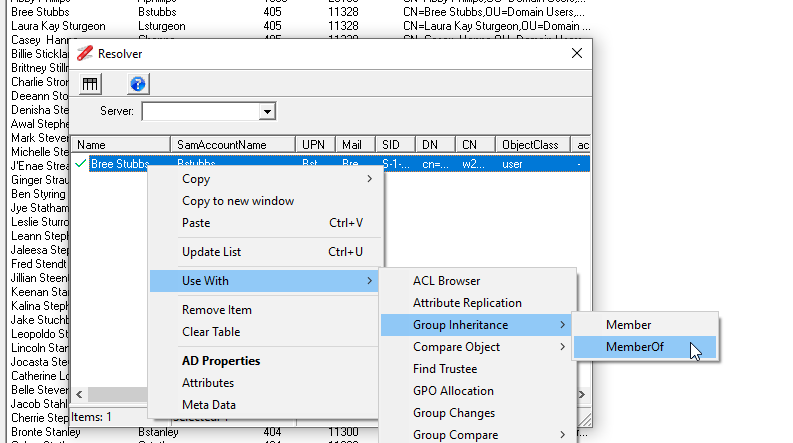
    Another method to see the nested group membership for a user is to use the Group Inheritance option,  The simplest way to access this option is to use the Resolver window.  For the selected object in the list, select the Add to Resolver from the content menu, this will display the Resolver window and add the user we are interested in.

    Once added to the Resolver window select Use With -> Group Inheritance ->MemberOf from the context menu

    This will display the nested groups details in a tree view to allow you to see visually the nested group membership.

    So this has shown you how you can identify which groups have caused the problem, but unfortunately there is no magic fix, in the case of nested groups, you will just need to reduce the number of groups in the user access token, this could be as simple as removing some of the groups that are no longer needed or could require a complete redesign of your groups and resource allocation. 

    In the case of SID history causing the token bloat, the only way to resolve this one is to remove the SID History from the domain, and manage the resulting cleanup, as SID History normally still exists post migration because someone was too scared to remove it.

    How To: Retrieve LAPS Password

    Local Administrator Password Solution (LAPS) is a Microsoft component that provides automatic management of the local administrator passwords on domain joined machines, details on LAPS can be found here

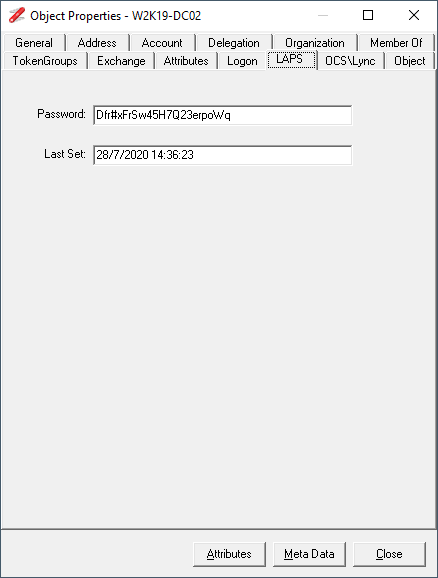
    In this article we will show how to use NetTools to display the password that LAPS has assigned to the local administrator account on workstations or servers. With NetTools it is very simple to retrieve the LAPS password, from the Users - Search enter the name of the machine of which you want to retrieve the LAPS password, make sure that the Return Users Only option is deselected and click Go.

    In the dialog select the LAPS tab.

    Note: the LAPS tab will only be displayed if the computer object has a password set and you have rights to read the ms-Mcs-AdmPwd attribute.

    How To: Check that a user has actually changed their password

    This is in response to a query raised on ActiveDir.org maillist about how to check if a user has actually changed their password and not just toggled the pwdlastset attribute to make it look like they have changed their password.   When a user changes their password a number of attributes are updated as a result of the password change, these include dbcspwd, lmpwdhistory, ntpwdhistory, pwdlastset, supplementalcredentials, and unicodepwd.  To be able to determine if the password has actually been changed, we have to look at the meta data for the object and check the last change date of the unicodepwd attribute, which contains the hash of the user’s password. 

    NetTools provides a couple of ways to view the meta data of an object, via Meta data dialog, running an LDAP query, or in this use case the Last Logon, will display all the details required.

    For a single user the Last Logon option will display both the pwdlastset and change date for the unicodepwd in the meta time column. This screenshot shows the results of a normal account password change, both the pwdlastset and meta time are the same.

    For this user the pwdlastset has been toggled, and it shows that the pwdlastset and meta data times don't match

    You can view the meta data on an object via the Meta Data Dialog, this option is provided throughout NetTools as a context menu option called Meta Data.  The easiest place to demonstrate this on the User Search option, search the account in question and then right click on the user and select Meta Data from the right click context menu.

    This shows an account that has had it's password changed. 

    This shows that the pwdlastset has changed but the other attributes have not changed, which is caused by the pwdlastset being toggled.

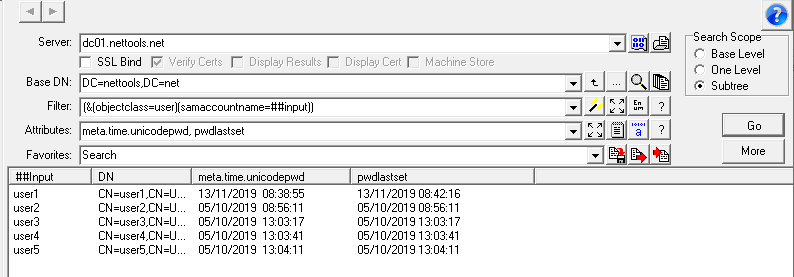
    The above options are for single accounts, but it is also possible in to check multiple accounts at once.  The LDAP Search option includes an option to return meta data as if it's an attribute of the object.  This is done using the meta option in the attributes field.  We can use an Input Mode of the LDAP Search to provide a list of the samaccountnames to check.

    In this example we are checking the details of the five user accounts, and it shows that user1 meta data doesn't match the pwdlastset date and time.

    Here is the favorite for the above query, see Favorites on how to import 

    [PwdLastSet Meta Data]
    Options=880030209675869
    Server=
    BaseDN=##default
    Filter=(&(objectclass=user)(samaccountname=##input))
    Attributes=meta.time.unicodepwd, pwdlastset
    DisplayFilter=
    Filename=
    Sort=
    Authentication=1158
    Separator=,

    With the introduction of v1.27, there is new query option that can be used to simplify this task.  In v1.27 the conditional attributes have been extended to support meta data queries.  This means we can do the checking in the query itself without any additional post query work.

    [PwdLastSet Meta Data] 
    Options=880030209675869 
    Server= BaseDN=##default 
    Filter=(&(objectclass=user)(samaccountname=##input)) 
    Attributes=samaccountname, Pwd_Change;{if:meta.time.unicodepwd;date!=pwdlastset:"Invalid":"Valid"} 
    DisplayFilter= 
    Filename= 
    Sort= 
    Authentication=1158 
    Separator=,


    Related Articles
    User Search
    LDAP Search
    LDAP Search Input Mode
    Meta Data Dialog
    Troubleshoot account lockouts
    Favorites

    How To: Find Active Accounts

    Finding which accounts are active should be simple, however, there are numerous ways to define if an account is active or not.  There is the simple method of checking if the accounts are enable or not, however, things get more complicated quickly after that, i.e. when was the account last used, has the account expired, has the account ever been used.

    This article provides a number of sample LDAP queries that can be used to determine if accounts are active or not, or you can combine these queries to generate a more complex query to meet your requirements.  The first part of the article shows fragment of the query and the last section shows how to combine these to create the final query.

    Account Enabled
    With AD an account is active based on a value stored in UserAccountControl attribute, however, the attribute uses bit logic to represent a number of different values, so you can't check for a specific value.  Details of the attribute can be here. The second bit of the UserAccountControl indicates if the account is enabled or not,  when not set (0) the account is active, when set (2) the account is disabled.  Using Matching Rule OID we can check the status of the individual bits in the attribute.  i.e. (useraccountcontrol:1.2.840.113556.1.4.802:=2).  The NetTools substitutions simplifies the entry of matching rules with a single character. See Substitutions.

    Account is disabled          (useraccountcontrol|=2)    
    Account is enabled           (!useraccountcontrol|=2)

    Account Expired
    Accounts can be set to automatically expire after a specified date, after which point the user will no longer be able to logon.  The date is stored in the AccountExpires attribute, this attribute uses a 64 bit integer to store the date.  To add to the complexity the attribute can contain more than just a date, it might not be set, or contains a 0 (zero), or 9223372036854775807 then account is not set to expire.  So a query check for expiry has to check for all the possible values to confirm if the account is active or not. Again the use of substitutions can simplify the entry of the Int64 date. 

    Account Expired            (&(!accountExpires={-1:})(!accountExpires=0)(accountExpires<={idate:now})) 
    Account not Expired     (|(!accountExpires=*)(accountExpires={-1:})(accountExpires=0)(accountExpires>={idate:now}))  

    Last Logon
    Most account audits state that if an account has not been used to a set period of time, the account should be consider inactive.  The last time the user logs on is stored in the LastLogon attribute, however this attribute is not replicated between domain controllers, so using this attribute you have to collect the LastLogon attribute from all domain controllers to determine the last logon.  There is another attribute that is replicated between domain controllers called LastLogonTimeStamp, however this attribute has a specific replication cycle which means that it may not contain the most recent logon date (more details here), but is usually close enough for most cases.  Again this attribute uses a 64 bit integer to store the date.

    Not logged on for 60 days        (lastlogontimestamp<={idate:now-60})
    Logged on in the last 30 days   (lastlogontimestamp>={idate:now-30})

    Password Changes
    In some cases the logonTime or the LastLogonTimeStamp will not be updated when a users logs on, these are normally associated to LDAP Simple binds or access through SharePoint.  another method to determine if an account is still being used to check the last time the user's password was changed, this assumes that an account password expires.

    Password change in the last 60 days     (pwdlastset>={idate:now-60})

    Unused New Accounts
    In this scenario an account is created but has not used since it was created.  The queries that is used to find these accounts depends on user provisioning process and which query should be used, if the user is required to change their password at first logon (scenario 1), or not (scenario 2).  If the user is required to change their password, then we check to see when the password was changed, if not, we check if the lastlogontimestamp has been set.

    Scenario 1
    Not used in the last 60 days            (&(whencreated>={zdate:now-60})(pwdlastset=0))
    has been used in the last 60 days    (&(whencreated>={zdate:now-60})(pwdlastset>={idate:now-60}))

    Scenario 2
    Not used in the last 60 days                          (&(whencreated>={zdate:now-60})(!lastlogontimestamp=*))
    Created in the last 60 days and been used    (&(whencreated>={zdate:now-60})(lastlogontimestamp=*))

    Type of Accounts and indices
    When creating queries it's best to create a query that limits the number of object that need to be searched and the number of attributes that are returned.  Building a query using attributes that are indexed will increase the performance of the query, reduce the load on the server executing the query, and reduce the amount of network traffic generated (See this Microsoft article for details). Some of the queries shown above use attributes that are not indexed, so using these queries in the format show could be very inefficient.  Limiting the queries to only search for specific object types will significantly increase the performance of the query, i.e only look at user account or computer accounts and the more indices that are used the better. 

    Users account               (&(objectCategory=user)(objectclass=user))
    Computer Accounts      (&(objectCategory=computer)(objectclass=computer))

    Combined Queries
    This section shows a number of the above query fragments combination to create the full query:

    Find active user accounts:
     (&(objectCategory=user)(objectclass=user)(!useraccountcontrol|=2))

    Find disabled user accounts
     (&(objectCategory=user)(objectclass=user)(useraccountcontrol|=2))

    Find active accounts, that have not expired
     (&(objectCategory=user)(objectclass=user)(!useraccountcontrol|=2)(|(!accountExpires=*)(accountExpires={-1:})(accountExpires=0)(accountExpires>={idate:now})))

    Find all inactive accounts, including expired, password not changed or logon in the last 60 days
    (&(objectCategory=user)(objectclass=user) (!useraccountcontrol|=2)(lastlogontimestamp<={idate:now-60})(pwdlastset>={idate:now-60})(&(!accountExpires={-1:})(!accountExpires=0)(accountExpires<={idate:now})))

    NetTools includes a number of predefined queries covering user accounts, see Predefined Queries

    See Favorites for more examples

    How To: Find what Schema updates have been performed

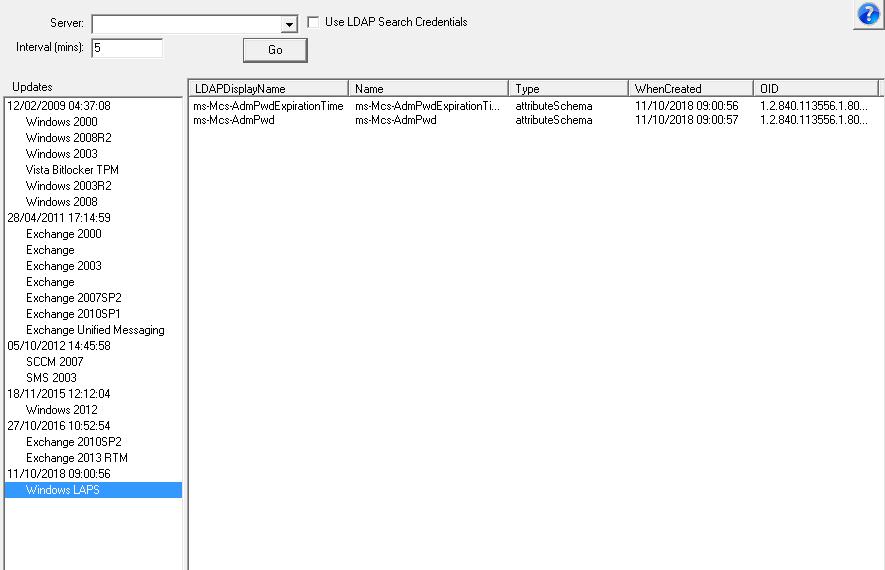
    The AD schema can be extended by installing additional schema extensions, which add additional classes and\or attributes.  There is no builtin method to determine what schema extensions have been installed.  NetTools, however, does have an option to display the schema updates that have been added to the AD.

    The Schema History option uses the WhenCreated attribute to determine when changes were made to the AD, and then using it's internal database to try and retrieve the name of the update based on what attributes or classes have been added.

    See Schema History List