Category Archives: HowTo

How To Restore deleted AD objects

This feature is supported in NetTools v1.30.9 beta and above

With the introduction of Windows 2008 R2, a new feature called Active Directory Recycle Bin was introduced.  This feature allow you to restore objects that have been deleted by mistake or maliciously, without the need to do a restoration from backup and the AD authoritative restore.  For new forest installs of Windows 2008R2 and above, this feature is enabled by default, for forests were the domain controller have been upgrade, the feature has to be manually enabled.  To enable the Active Directory Recycle Bin see this page which has the details.

The only method that was originally provided to recovery delete object was through LDP, which requires multiple steps and configuration changes to be able to restore an object.

NetTools provides a simple method to restore single or multiple objects in a single operation.  This feature is incorporated in the LDAP Browser option.

To be able to restore a delete object you must meet the following prerequisites:

  • The recycle bin feature must be enabled
  • The recycle bin feature must have been enabled before the objects were deleted
  • Be a member of Domain Admins or equivalent

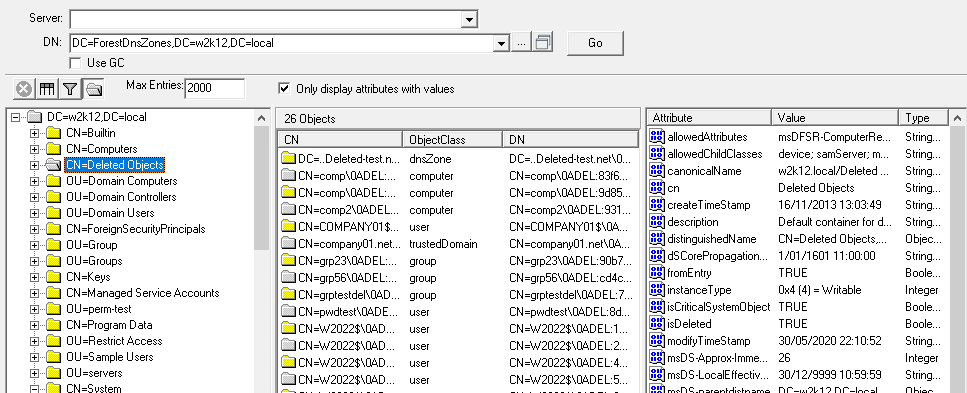
When an object is deleted it's moved to the Deleted Objects container, in the partition that the object existed.  This also means that objects that have been deleted from the Configuration, DomainDNSZones, and ForestDNSZones can be restored using NetTools.  When browsing the partitions with LDAP Browser the deleted object will be displayed in CN=Deleted Objects,<partiton dn>.

Deleted Objects Container

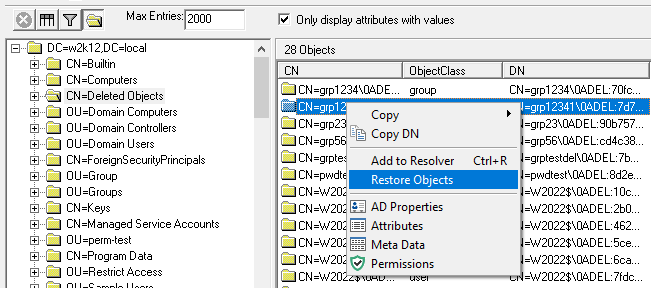
Objects that are listed in the Deleted Objects container can be restored by select the objects and right clicking and selecting Restore Objects from the context menu.

Context Menu - Restore Objects

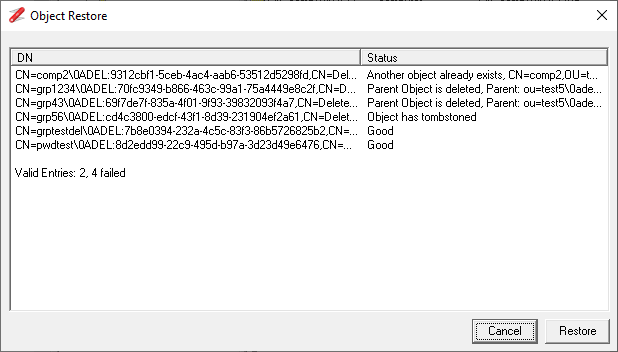
The context menu option will open the Object Restore dialog, shown below.  When the dialog opens it will perform a number of validation checks of the selected objects, to ensure that the common issues are detected before the restore is attempted.

The Validation consists of the following checks:

  • If the object has been tombstoned
  • If the target parent container still exists
  • if the target parent container is deleted
  • If a new object with the same name has been created in the target parent

The objects that pass the validation will show a status of Good, for objects that fail these checks, the reason will be displayed in the status column and can't be restored. See Troubleshooting section for details on how to try and resolve these issues.

Object Restore - Validation

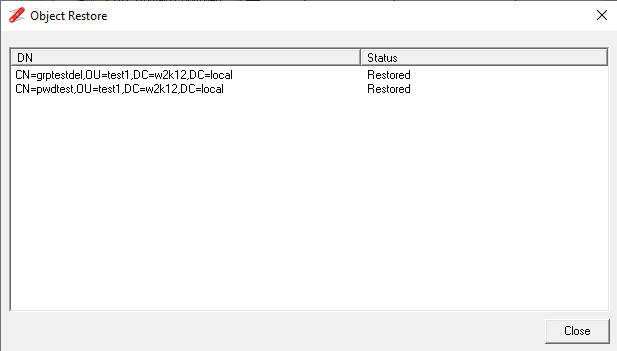
Once the validation is complete the results are shown at the bottom of the list of objects, and then the Restore button will be enabled.  By clicking the restore button, only the objects that are valid will be restored.

Object Restore - Restored

The context menu provides the standard option to review the restored objects.

Restoring A Deleted OU

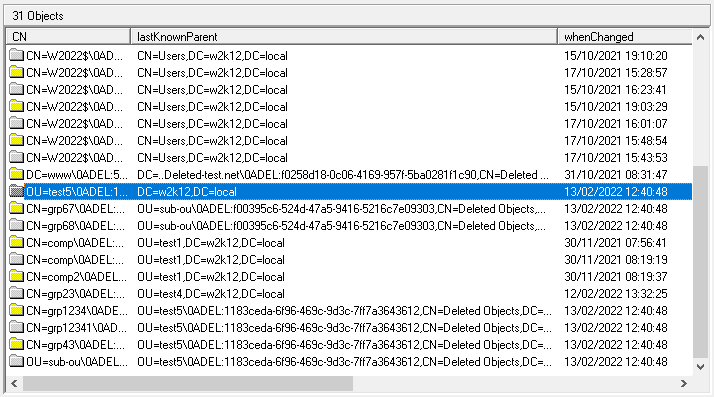
If an OU has been deleted which contains multiple objects and child OUs, these can also be restored, however, the OU structure must be restored first, then followed by the object in the OU.  The simplest method to find objects that have been deleted from the same the OU, is to change the column displayed to include the LastKnownParent and WhenChanged
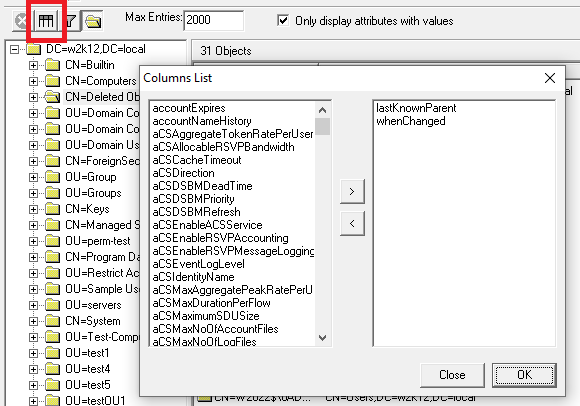
Change Columns

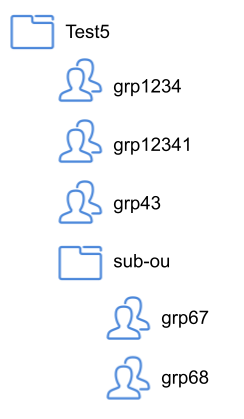
For this example, here are the details of the OU Structure that has been deleted.  Sorry about the names, it was an OU that was already created!

Deleted OU Structure

These are the steps needed to restore the OU structure

  • Restore the Parent OU
  • Restore any sub level OUs
  • Restore the child objects

Restore Parent OU

First you will need to restore the top level OU called Test5, sort the columns by the LastKnownParent column to make it easier to find the parent OU for Test5, in this case the root.

Object Restore - Parent OU

Restore the sub level OU

With the Parent OU restored it's now easier to find which objects were in the OU structure, as the LastKnownParent has now been updated, next restore any sub level OUs, in our example sub-OU has been restored.

Object Restore - sub level OU

Restore child Objects

Once the OU structure has been restored, we are ready to restore the objects from the OU structure, one things that we need to be conscious of, some objects may have been deleted previously and we don't want to restore these objects, using the WhenChanged column to help identify the objects we want to restore.

Object Restore - OUs Restored

Troubleshooting

This section provide somes some extra details of the possible error messages that can happen during the validation.

Object has tombstoned

The object was been delete grater than msDS-deletedObjectLifetime period and now the object has been tombstoned. The object has the IsRecycled attribute set to true.  Which means most of the attributes of the object have been removed and the object only exists to ensure replication is consistent between the domain controllers and the object can't be restored.

Parent Object is deleted

You are trying to restore an object to a parent object, but the parent object is currently deleted, restore the parent object first, then try restoring the child object.

Parent Object not found

Something has changed from selecting the object and running the validation, close the Object Restore dialog and try again.

Parent details not found

Failed to read the LastKnownParent attribute, confirm the attribute is set and try again.

Another object already exists

Since the object was deleted, another object with the same name has been created in the parent OU, either move or rename the new object so you can restore the deleted object.

Failed to get DN details

Failed to read the LastKnownParent or msDS-LastKnownRDN attributes, confirm these attributes are set and try again.
How To Display which Fine Grain Password Policy is applied

In this post we look at how to display which Fine Grain Password Policy (FGPP) is being applied to a user.

Fine Grain Password Policies were introducted in Windows 2008, and provide the ability to define different password policies that can be assigned to users or members of a group.  The assigned FGPP will take precedence over the default domain policy, and can be used to provide a different settings depending on your requirements, this could be used to have a more strict password policy for admin accounts.

The FGPP configuration is stored in a Password Security Object or PSO and multiple PSO can be created with different settings.  These are stored in the Password Settings Container under the default name context i.e CN=Password Settings Container,CN=System,DC=w2k12,DC=local.

A user can be assigned multiple FGPP, but only one will be active and used to control the user password requirements.  The msDS-PSOApplied attribute is used to list all the PSO that are assigned directly to user or group objects.  The msDS-ResultantPSO attribute is used to show which FGPP is being applied to the user.

NetTools is able to display the FGPP polices and which FGPP is allocated to a user. (Version 1.30.7 and above required)

If we search for a user using the Quick Search field on the toolbar.

Quick Search

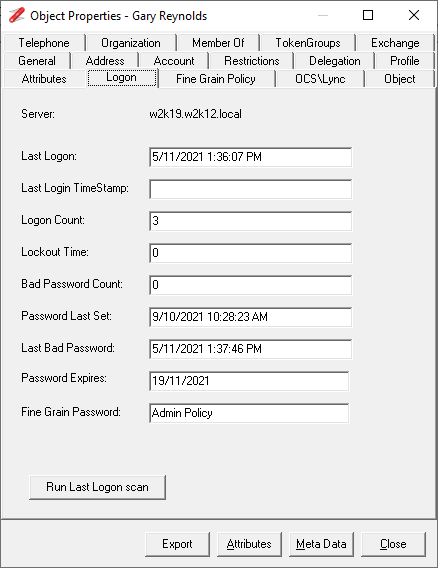
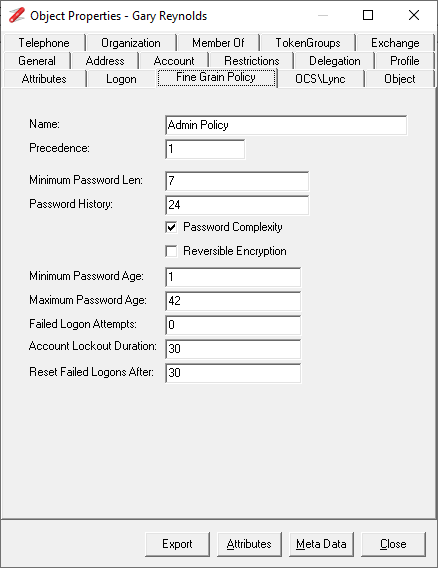
From the search results if we double click on the user's account and open the AD properties dialog, the Logon tab, shows which Fine Grain Policy is being applied and the Fine Grain Password tab shows the settings of that policy.

AD Properties - Logon
AD Properties - FGPP

How To Find Assigned Permissions in AD (pre v1.30.8)

In this post we will look at how to find where a user or group have been assigned permissions in the AD this is based on NetTools pre v1.30.8.  For details using NetTools v1.30.8 or later see this post.

For this task we will use the Find Assigned Trustee option in NetTools, which will allow us to search the entire domain or a specific OU structure and report on any permissions that are assigned to the specified user or group.  As this will search every object in the AD, it's best to run this on a server or workstation that is on the same network segment as the Domain Controller, or on the Domain Controller itself.

First we need to find the user or group we are interested in, in the Quick Search box enter the name of the user or group and click the search button.  In this case we are searching for the user called greynolds.
Quick Search

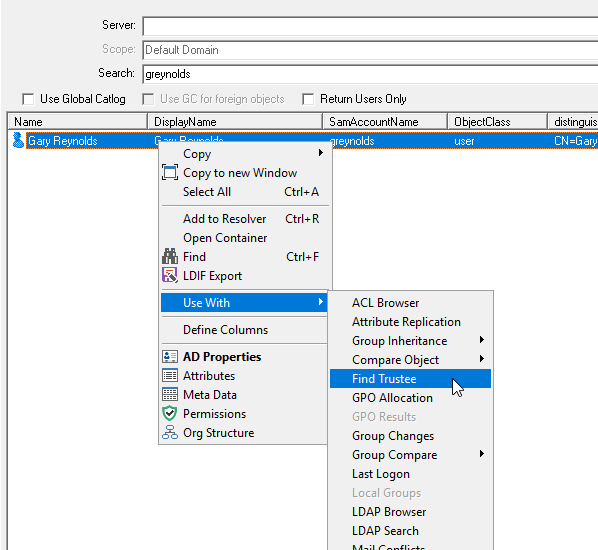
The results of the search will be displayed in the User Search option, right click on the correct user or group from the list, and select Use With -> Find Trustee from the context menu.

Select Find Trustee menu option

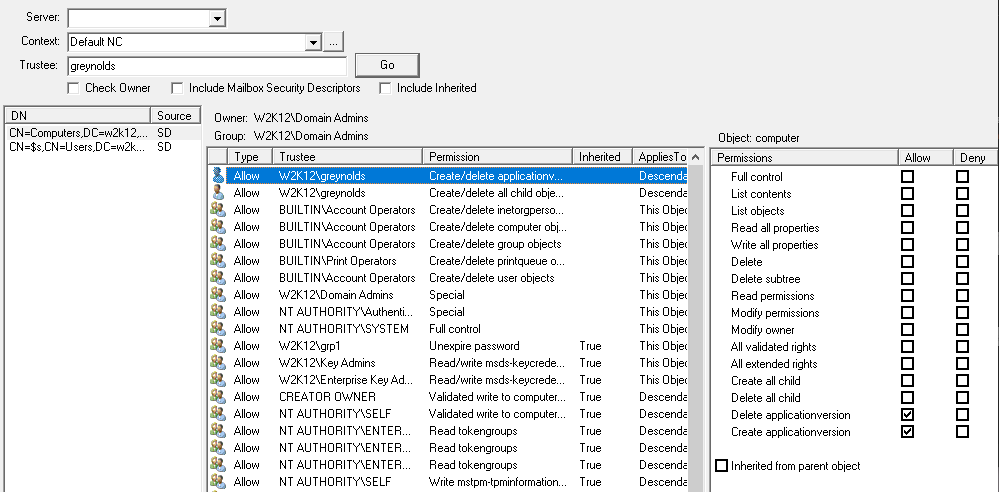
NetTools will switch to the Find Trustee Assignment option and start searching for selected user or group in AD.  Depending on the size of your AD this might take a while as it will read the permissions of every object in the domain context.  Once the search is complete all the objects that user or group have been assigned direct permissions will be displayed.

Find Trustee Assignments

By clicking on one of the objects listed in the left results pane you can view the permissions that have been assigned to the user or group.

It's also worth completing a search of the Configuration partition in case permissions have been assigned there as well.  This can be done by changing the Context field to Configuration NC and pressing Go.

How To Display the Meta Data of an AD object

In this post we look at how to use NetTools to display the replication meta data of an AD object.

Displaying the replication meta data of an AD object is a core capability, and it is available as a context menu item throughout NetTools.  See Basics and Meta Data Dialog for more details.

In this post we will look at the two most common scenario, searching and browsing for objects that you want to view the replication meta data.

Searching Method

The search option is best for common AD objects such as users, groups, computers, etc, that are in the default domain context, If you want to view the meta data information for an object that is in the schema, configuration, DNS, or AD LDS (ADAM) partitions, use the Browse Method below.

To search for an object we can use the quick search field on the toolbar at the top of NetTools.  In the field enter the name of the object you are wanting to find and click the search button.

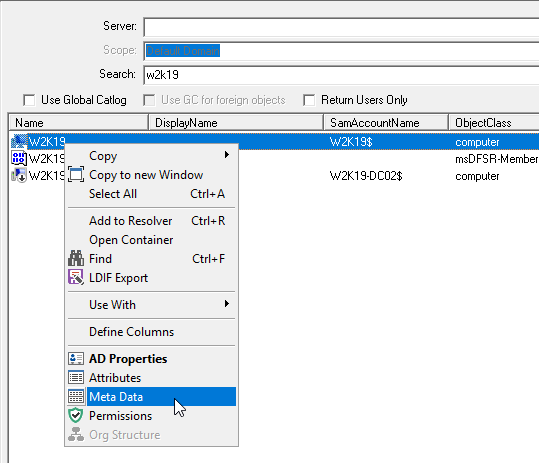
In this case we are search for the computer object for w2k19.  The Search screen will be displayed with the results of the search.

Search Results

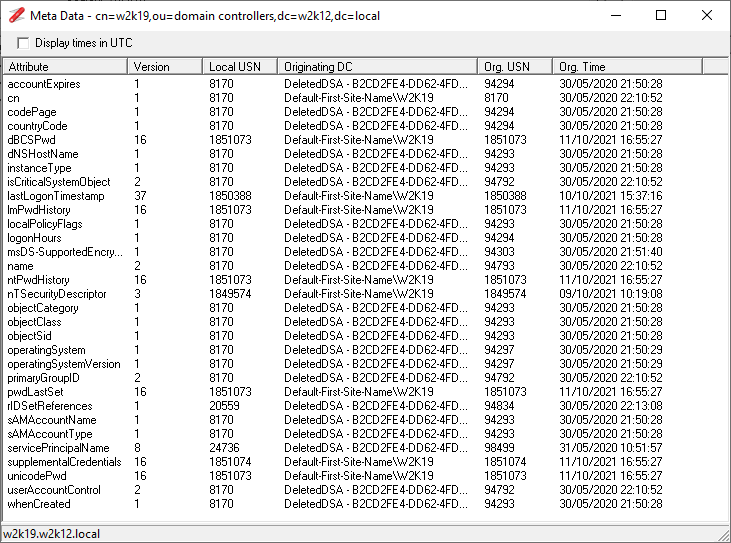
If you right click on the required item and select the Meta Data menu items, the Meta Data dialog will be displayed.

Meta Data Menu
Meta Data Dialog

For more details on the Search option see User Search

Browsing Method

The advantage of using the browse method, is it allows you to display the meta data for objects that are not in default domain context and wouldn't be found by the search method.  You can browser the required name context, configuration, schema and DNS, or AD LDS (ADAM) partitions.  To use the browse method you need to select the LDAP Browser option under LDAP in the left hand option selection pane.

LDAP Browser

Selecting the required partition from the drop down list in the DN field.

Select partition

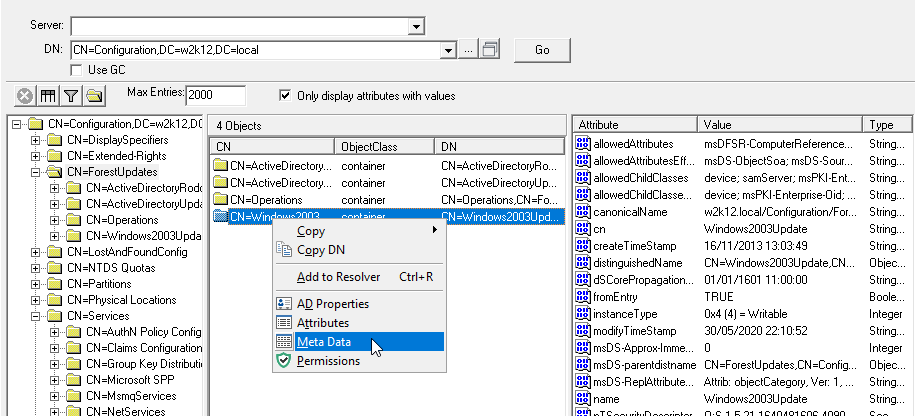
You can select one of the partitions from the drop down list, or enter the required DN in the field, then click Go.  The view will be populated and you can browse the partition to find your object. You can right click the object in the navigate tree or the list view and select the Meta Data menu item to display the Meta Data of the selected object.

LDPA Browser - Meta Data Menu

This will show the replication Meta Data dialog.

Meta Data Dialog

For more details on the LDAP Browser option see LDAP Browser

How To Troubleshot which GPOs have been applied

Sometime is not immediately obvious where to start when troubleshooting GPO delivery issues.  NetTools provides a number of features that will let confirm the GPO configuration and then verify which GPOs have been applied to the computer and user by reading the results directly from the machine.

To start troubleshooting we need to find the computer in the Active Directory and confirm which GPO will be applied to the machines.  In the quick search box enter the name of the computer that you want to troubleshoot.

Quick Search

In this case we are searching for the W2k19 which is a domain controller, click on the search button.

Search Results

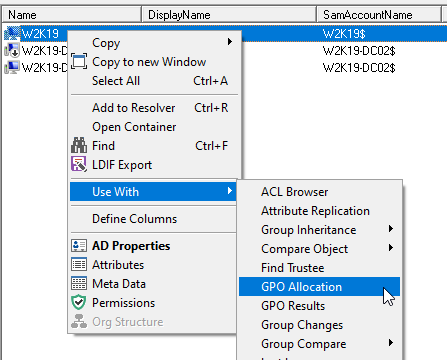
The search results will show all objects that match the search name.  Now if we right click on the required item and select Use With->GPO Allocation from the context menu.

GPO Allocation Menu

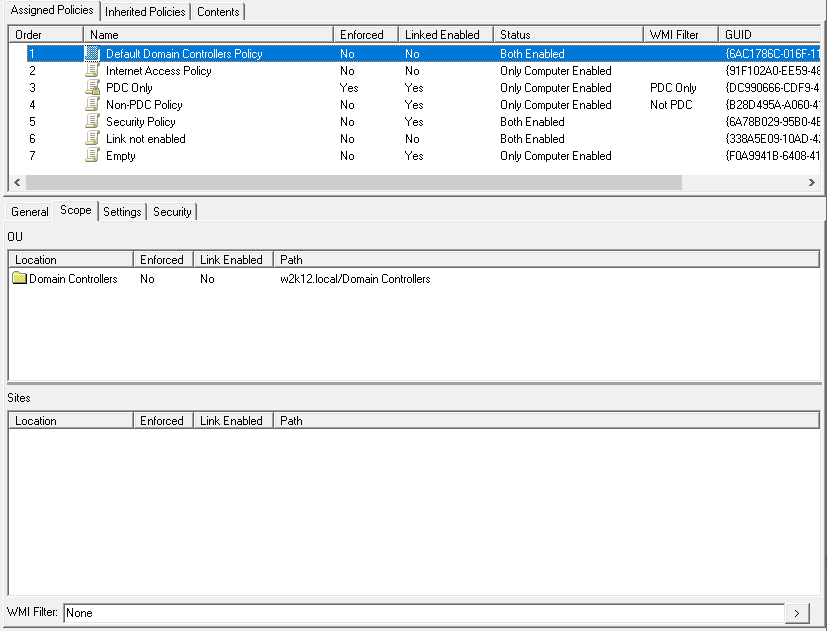
The view will change to the GPO Explorer and automatically navigate to the OU that contains the computer object.  It will also display which GPOs have been assigned to the OU.  In this view you can confirm which policies have the links enabled and any WMI filters that have been applied.

GPOs Applied

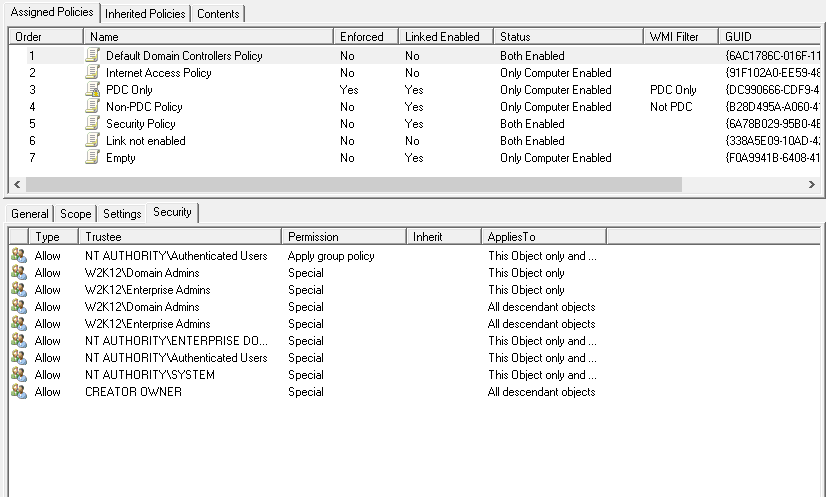
By clicking a policy the details of the policy are displayed in a split screen, so you can review the settings or configuration without leaving the OU view.  While here check the version numbers of policy on the general tab, if the version number is zero, the policy will not apply as the policy engine will think its empty.

GPO Explorer tab views

General
Scope
Settings
Security

The Inherited Policies tab will show which policies have been inherited down the OU structure and the order in which the policies will be applied. This view also supports the split view capability.  Confirm that the policy you are troubleshooting is listed.

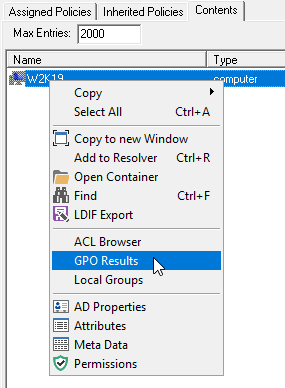
Now if we select the Content tab the list of object that are in the OU are displayed. If there is more than 2000 objects in the OU, you will need to adjust the max entries field to display more.

Find your machine in the list and click on the machines and select GPO Results from the context menu.

GPO Results

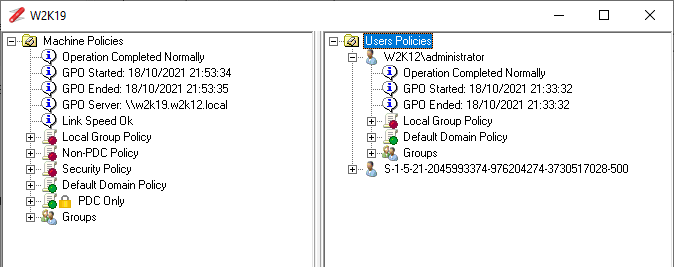
This will open a separate window and display what policies have been applied to the machine.  The icons indicate if the policy was successfully applied to the machine or not.  Policies that were successfully applied will have a green indicator, while policies that failed to be applied will have a red indicator.  If you expand the policy item in the list the details why the policy failed to apply will be displayed, items that red indicator that is the reason why the policy was not applied.

For the GPO Results to be displayed the machine must be on and connected to the network.

GPO Results

Once the GPO Result window is populated, using the Quick Search field on the main form, you can now search for the user and repeat the steps to see the GPO Allocation for the user object.  You can to expand the users policies tree in the GPO Results window to see which policies were applied to the user.

For more details on the information displayed in the GPO Results window see the GPO Viewer page

How To: Display the time when members were added or removed from a group

Based on functionality in V1.30.3 and above

The standard AD tools don't expose the time when a member is added or removed from a group, and the normal method is to use the security event log to retrieve these details, however, this makes the assumptions that auditing was enabled when the change was made and the security event log hasn't wrapped and the details are still available, which is not always the case.

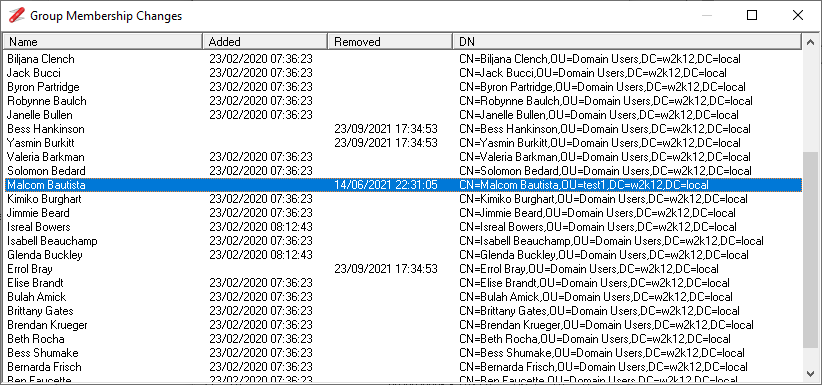
There is another way to get this information that doesn't rely on auditing being enabled or the size of the security event log to capture the details.  The AD does maintain when changes happened in the replication data for group objects, and this data contains the exact details of the time when these membership changes occurred.  The AD uses this information enable changes to be replicated to other domain controllers in the domain or forest.  The replication data is not easily accessible with the standard AD tools, however NetTools has a simple feature to allows you to display all the membership changes for a group, including the time they happened. The time a member was added or removed shown in corresponding column.

Group Membership Changes

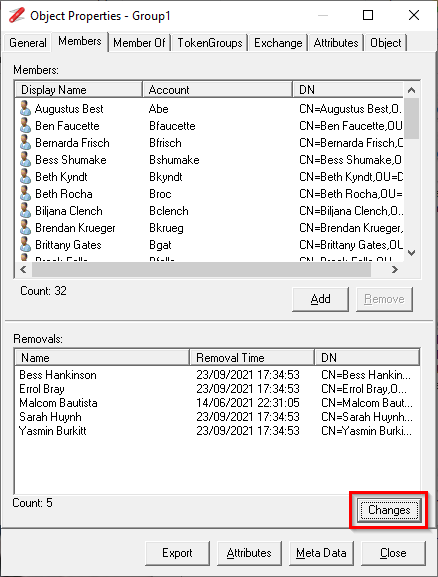
The option is available on the Members tab in the AD Properties dialog, at the bottom of the tab is the Changes button, when this is clicked a separate window is displayed with all the change details.

AD Properties - Group Changes

How To Find Active Directory Effective Permissions

Some of the features shown here are only available in NetTools 1.31.9 and above.

NetTools includes the Permissions Browser option, which also allows you to see the effective rights for a nominated trustee, it also provides the ability to change the trustees rights to assess the impact this will have trustees access to objects in the AD.   In this post we will look at how to use this option to view the effective rights of a user.

Permissions Browser

To configure Permissions Browser to show the Effective Rights we need complete the following steps.

How To Display Active Directory Effective Permissions

    Select the Permissions Browser

    Open NetTools and select the Permissions Browser option under Access Control in the left hand pane.

    Display AD Permissions

    Select the Connection Profile or server to connect to.  See Connection Profiles

    Select the Context you wish to view

    Click Refresh

    You can now navigate through the AD to the object that you want to check the effective permissions

    Select Trustee

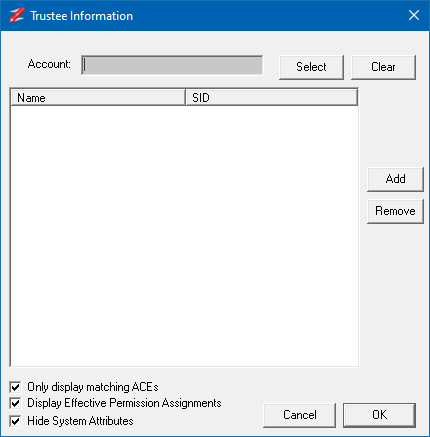
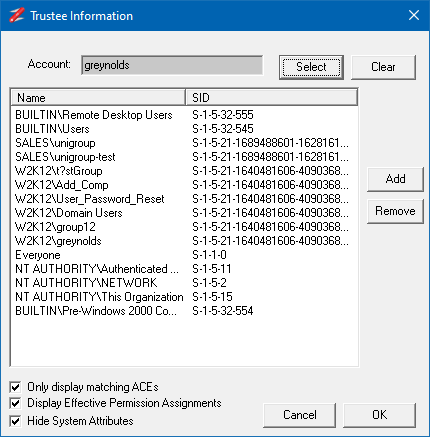
    To display the effective rights for a trustee, we need to select the trustee using the Trustee Information dialog, click on the Trustee button

    Trustee Information

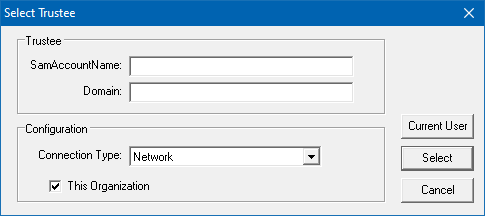
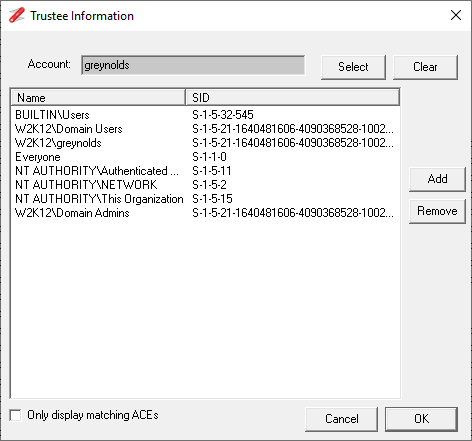
    Press the Select button to select the Trustee, and enter the name of the trustee. This can be a user, computer, or group. The Current User button can be used to retrieve the current group list from the currently authenticated user, if UAC is enabled, any disabled groups will be excluded from the token.  Then click Select.

    Select Trustee

    The Trustee Information dialog will be updated with the SIDs that user in a member of, this is the user's access token, this information will be used to determine the effective rights of the user.

    Trustee Information

    View Effective Permissions

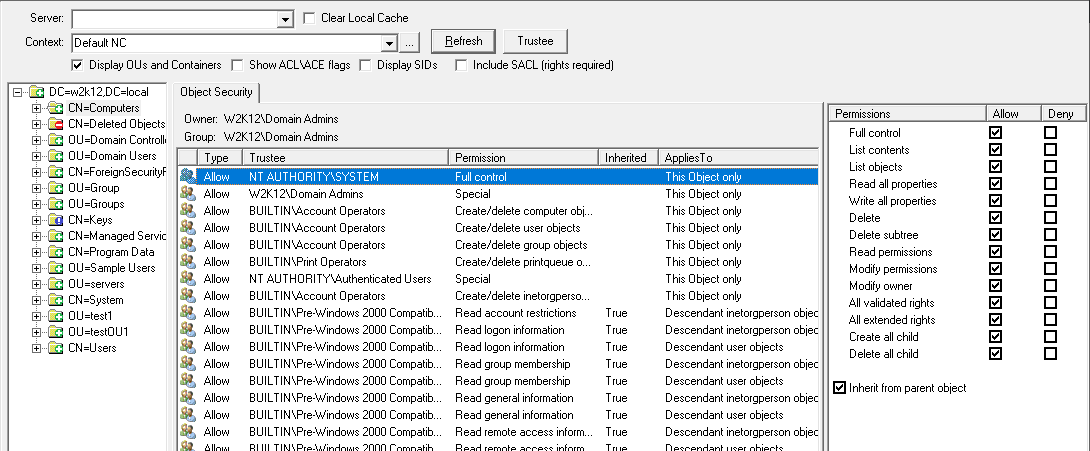
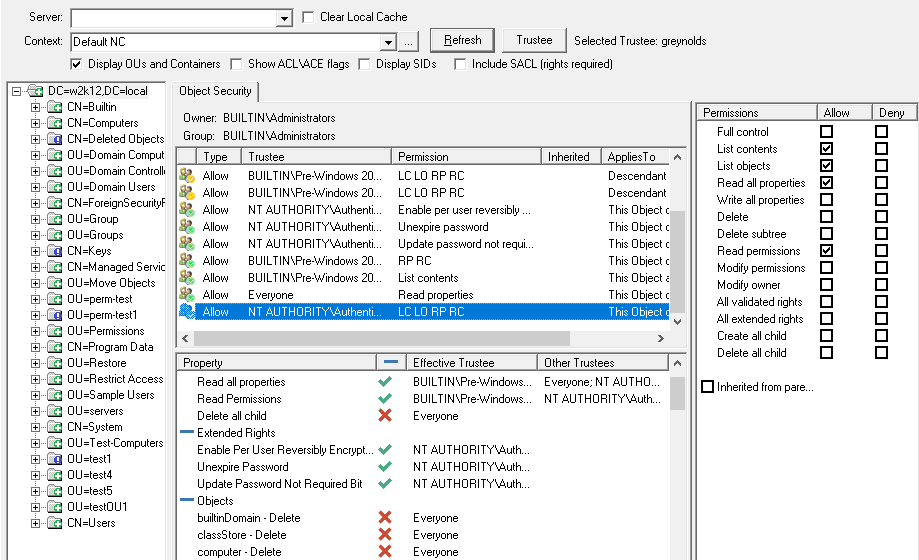
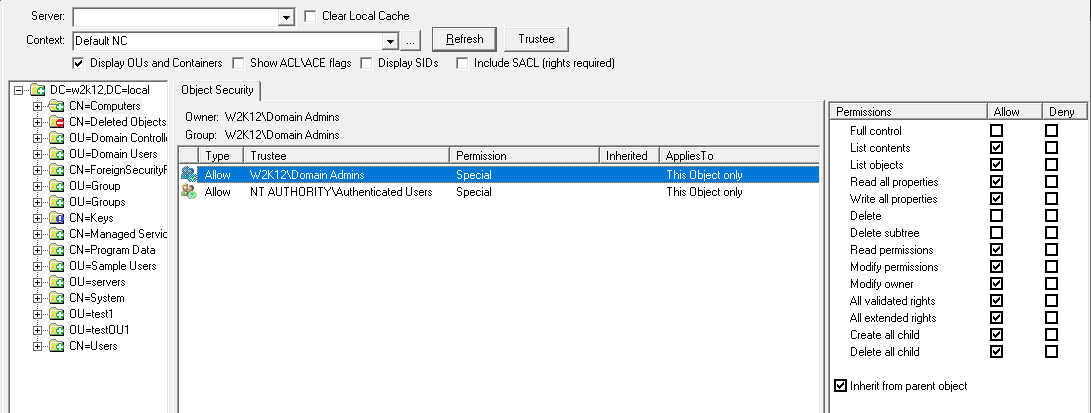
    The ACL list is now filtered showing only the permissions that will be applied to the trustee when they try to access the AD object.  In this example for the selected user has a number of permissions that are granted by the their access token.  The lower section displays the effective permissions of the user on the selected object.

    See the AD Permissions Browser page for information on the icons and there meanings.

    See the AD Effective Permissions page for more information on the details and available options.

    Trustee Mode - Effective Permissions

    Alternative Method

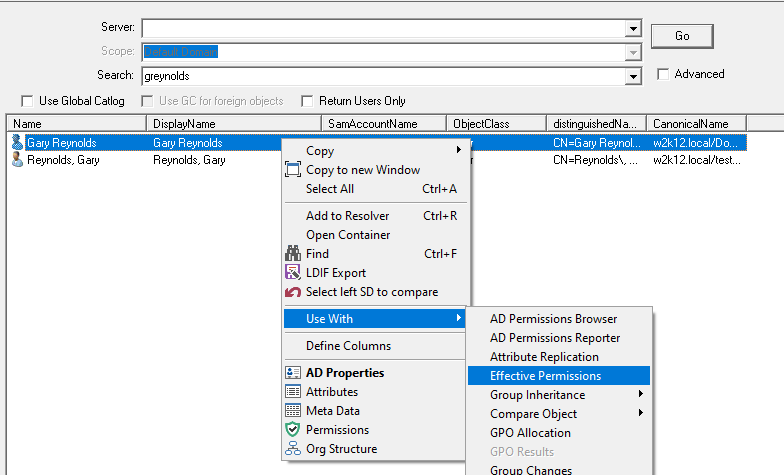
    The alternative and simpler method is to use the Use With context menu from the user search option.  Either select the Search or use the quick search option, search for the user you want to check the effective permissions for.

    Use With - Effective Permissions

    The right click on the corresponding user and select Effective Permissions under the Use With context menu.  This will switch to the AD Permissions Browser option and set the Trustee.  You can now browse the directory and view the effective permissions as you browser.

    Modelling Effective Rights

    One of the features of the Trustee Information dialog is that we can model changes to the trustees effective rights.  By using the add and remove buttons we can add or remove groups included in the trustee's access token, which is used to display the effective rights, this allows you to model how group changes will impact Trustee's access.

    Trustee Information - Added Domain Admins

    In this example above, the access token of the Trustee has been modified to include the Domain Admins group.  Below is the Permissions Browser is showing the effective permissions based on the updated access token for the Trustee.  Now two permissions are shown based on the updated access token.

    AD Permissions Browser - Effective Rights

    You can now browser the AD to see what rights that the Trustee has on the objects in AD.  To turn off the Effective Rights view, click on the Clear button in the Trustee Information dialog.

    How To: Clear the group membership for a list of users

    In this post we will look at how to remove the membership of a number of users using the NetTools LDAP Search option. This action is typical in a user deprovisioning activity where user accounts are moved to a separate OU and group membership of the users are removed.

    We could also use LDAP Search to move the user objects to the OU as well, but we will assume that the user accounts are already in the target OU.

    To complete this operation we need to complete the following steps:

    Clear Group Membership Steps

      Get a list of groups that users are a member of

      First go to the LDAP Search option and click on the populate button.

      Populate

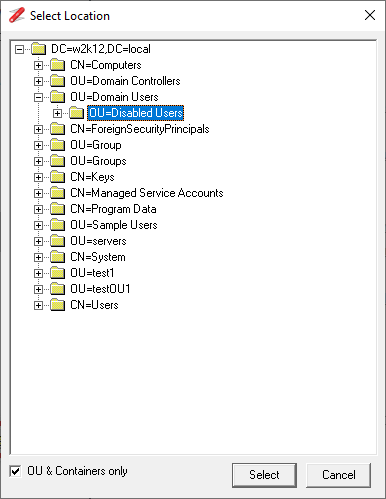
      Click on the OU Selector and select the OU that contains the users that need their group membership cleared.

      OU Selector

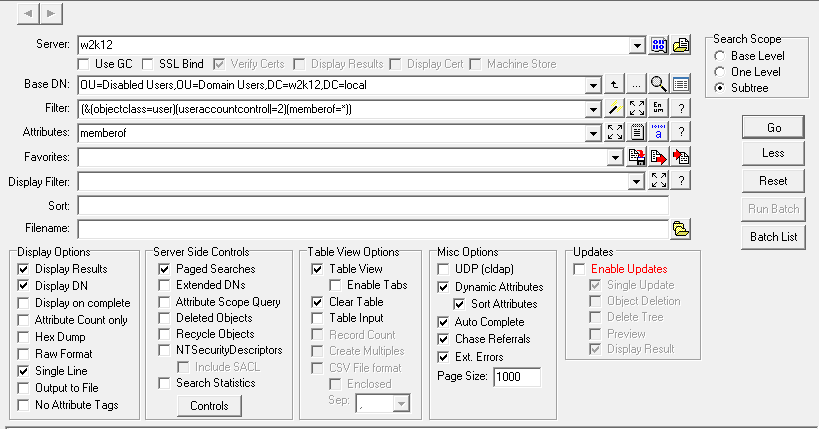
      The Base DN will be set to the required OU.

      To limit the scope of the query to only the users that are disabled and have group membership, change the filter to (&(objectclass=user)(useraccountcontrol|=2)(memberof=*))

      Set the Attributes field to memberof

      Change the Search Scope to either One Level or Subtree as required

      Click the More button

      Select the Single Line option -  this will cause each of the user’s group memberships to be displayed on a separate line

      You should have something like this:

      List Group Membership

      Click Go

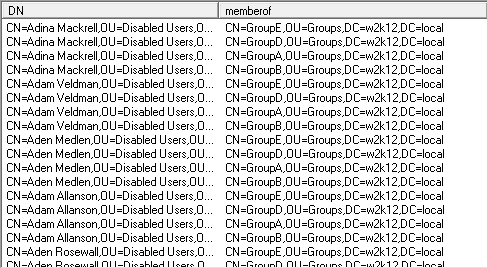
      You should get a complete list of the group membership for all the users, with each group membership on a separate line in the table view.  The DN field is the DN of the user, and Memberof is the group that the user is a member of.

      Group List Output

      Remove users from groups based on list produced in step 1

      We are going to use the input mode functionality with an update query to remove the users from the groups.  As users are added to groups, so the update query will target the groups and remove the users from each group.

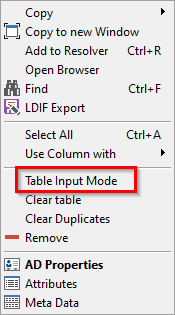
      Right click on the table view and select the Table Input Mode or select Table Input in the options

      Input Mode

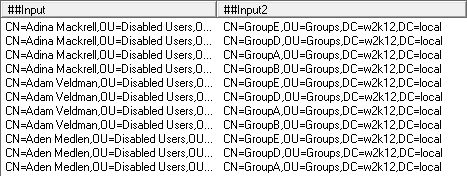
      The column headers will change to ##Input and ##Input2, the entries in the columns can now be used as input to the query.   See Input Mode for more details.

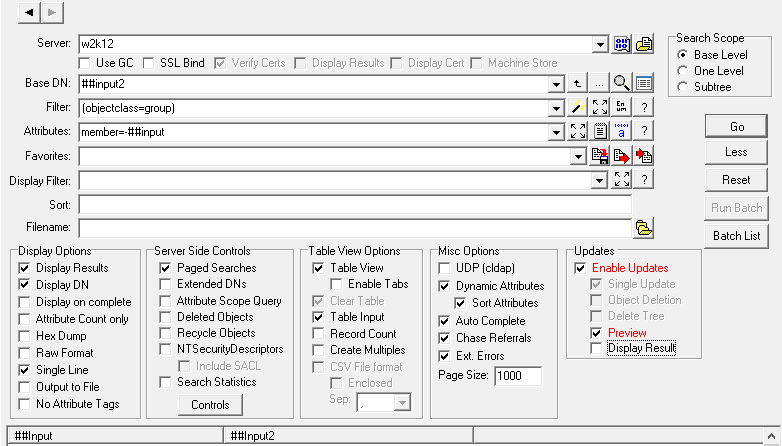
      Change the Base DN field to read ##input2 -  which will target the group based on the list of DNs in the ##input2 column in the table

      Input Mode Column Headers

      We now need to change the query to remove the users from the groups.

      Change the Filter to (objectclass=group)

      Change the Attributes field to member=-##input

      Change the Search Scope to Base Level

      Select the Enable Updates options, for more details see Update Queries.

      Deselect the Display Results – this is to increase performance, the remaining membership of the group will not be displayed.

      Remove Group Members

      With the Preview option selected click Go.

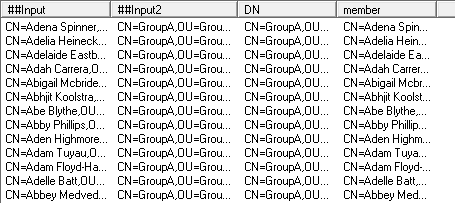
      Check all the entries to confirm that each line has a DN and member entry added.  If one or both of these fields are missing on a line, it means that, the group on that line doesn’t exist.  This shouldn’t happen as we just exported the group membership, but someone else might have changed the group membership between the steps being run.

      Preview Results

      Once confirmed unselect the Preview option and click Go

      You will get a warning message, click Yes

      The member field will be changed to Updated if the user was successfully removed from the group, if the update failed an error message will be displayed.

      Update Results

      The details in the table view can be copied and pasted into a spreadsheet to record what changes have been made.  It can also be used to undo the changes that have been made.  By change the Attributes field to member=+##input and running the update query again, the users will be added back into the groups.

      How To: Using Search Stats OID 1.2.840.113556.1.4.970

      Active Directory and LDS provide a server side control which when added to a query will provides statistics on the efficiency of the query that was executed, the specific control is OID 1.2.840.113556.1.4.970 - LDAP_SERVER_GET_STATS_OID and the details can be found here.

      The NetTools LDAP Search option provides a simple checkbox option to enable this server side control to be added to queries.  The option is found in the Server Side Controls section, called Search Statistics.  When the query is run and the user has the appropriate permissions the search statistics will be returned.

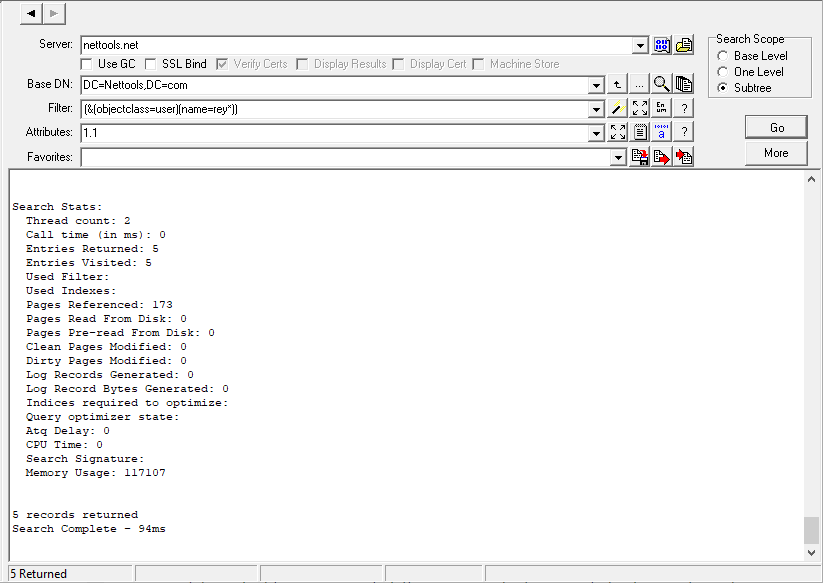
      When the query is executed the Statistics are displayed in the output panel after the results of the query.  Below are the statistics returned by Windows 2016 server.

      The version of the operating system running on the server, will determine the statistics that will be returned.  As Windows evolved the level details returned by the server has also increased.  Windows 2000 only provided 4 different statistics, Windows 2003 increased this to 6, and for Windows 2008 this increased to 15 and it also introduced a new format which provides more details but the fields are dynamic, rather than the older static fields.

      NetTools detects the Domain Controller Functional level of the server and automatically adjust the control parameters to select the highest level of detail available for the server.

      The table below shows which statistics level are returned by each version of Windows

      2000 2003/R2 2008/R2 2012/R2 2016 2019
      StatsResponseValueV1 x
      StatsResponseValueV2 x
      StatsResponseValueV3 x x x x
      StatsResponseValueV4 x x x x

      The details for each set of Stats can be found below.  

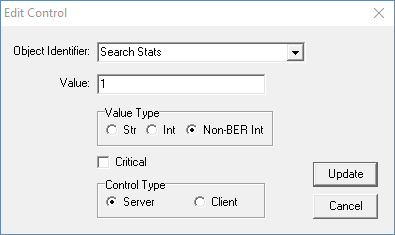
      While NetTools will automatically select the stats level based on the domain controller functional level, it is possible to manually specify the required stats level using the Server Side Controls dialog.  To do this, first uncheck the Search Statistics option, then click on the Controls button in the Server Side Control section and add a control as shown below, the Value to 1 for the corresponding V1,V2, or V3 supported by the server or a Value of 5 for the V4 stats.

      These are the Statistics returned by a Windows 2019 server with the Value set to 1:

      Search Stats:
        Thread Count: 1
        Call Time (ms): 0
        Entries Returned: 3
        Entries Visited: 4
        Filter: ( & (objectClass=user) (name=gary*) ) 
        Index: idx_name:4:N;
        Pages Referenced: 126
        Pages Read: 0
        Pages Pre-Read: 0
        Clean Pages Modified: 0
        Dirty Pages Modified: 0
        Log Records Generated: 0
        Log Records Bytes Generated: 0

      These are the Statistics returned by the same query, with the Value set to 5

      Search Stats:
        Thread count: 1
        Call time (in ms): 0
        Entries Returned: 0
        Entries Visited: 0
        Used Filter: ( & (objectClass=user) (name=gary*) ) 
        Used Indexes: idx_name:4:N;
        Pages Referenced: 27
        Pages Read From Disk: 0
        Pages Pre-read From Disk: 0
        Clean Pages Modified: 0
        Dirty Pages Modified: 0
        Log Records Generated: 0
        Log Record Bytes Generated: 0
        Indices required to optimize: 
        Query optimizer state: ( & (objectClass=user:878204) (name=gary*:4) ) 
        Atq Delay: 0
        CPU Time: 0
        Search Signature: b4cce897-7577-b624-5d18-2f5a9e90754f
        Memory Usage: 26744
        JET LV Read: 0
        JET LV Created: 0
        Total call time (in ms): 0
        Total CPU time: 0
        Number of retries: 0
        Correlation ID: e2a4641a-0714-44cc-b1bf-a0b0ca8e055c
        Links Added: 0
        Links Deleted: 0

      These are the various Stats data lists:

      StatsResponseValueV1 ::= SEQUENCE {
        threadCountTag            INTEGER
        threadCount               INTEGER
        coreTimeTag               INTEGER
        coreTime                  INTEGER
        callTimeTag               INTEGER
        callTime                  INTEGER
        searchSubOperationsTag    INTEGER
        searchSubOperations       INTEGER
      }
      StatsResponseValueV2 ::= SEQUENCE {
        threadCountTag        INTEGER
        threadCount           INTEGER
        callTimeTag           INTEGER
        callTime              INTEGER
        entriesReturnedTag    INTEGER
        entriesReturned       INTEGER
        entriesVisitedTag     INTEGER
        entriesVisited        INTEGER
        filterTag             INTEGER
        filter                OCTET STRING
        indexTag              INTEGER
        index                 OCTET STRING
       }
      
      
      StatsResponseValueV3 ::= SEQUENCE {
        threadCountTag INTEGER
        threadCount INTEGER
        callTimeTag INTEGER
        callTime INTEGER
        entriesReturnedTag INTEGER
        entriesReturned INTEGER
        entriesVisitedTag INTEGER
        entriesVisited INTEGER
        filterTag INTEGER
        filter OCTET STRING
        indexTag INTEGER
        index OCTET STRING
        pagesReferencedTag INTEGER
        pagesReferenced INTEGER
        pagesReadTag INTEGER
        pagesRead INTEGER
        pagesPrereadTag INTEGER
        pagesPreread INTEGER
        pagesDirtiedTag INTEGER
        pagesDirtied INTEGER
        pagesRedirtiedTag INTEGER
        pagesRedirtied INTEGER
        logRecordCountTag INTEGER
        logRecordCount INTEGER
        logRecordBytesTag INTEGER
        logRecordBytes INTEGER
      
      StatsResponseValueV4 ::= SEQUENCE OF SEQUENCE {
            statisticName         OCTET STRING
            CHOICE {
               intStatistic [0]       INTEGER
               stringStatistic [1]    OCTET STRING
            }
      }

      How To: Display what members were removed from a group

      Features shown are only available in NetTools v1.29.11 or later

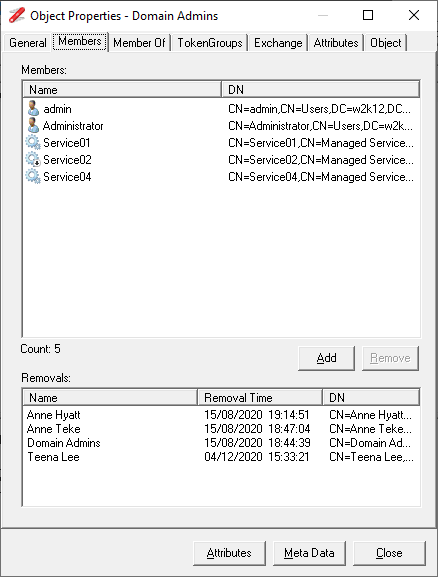
      In this post we look at how to show which members, i.e. users, computers, groups etc, have been removed from a group.  Within NetTools this is a simple task using the AD Properties dialog, the Members tab shows the current members of the group and also which objects have been removed and when, as shown in the screenshot below.

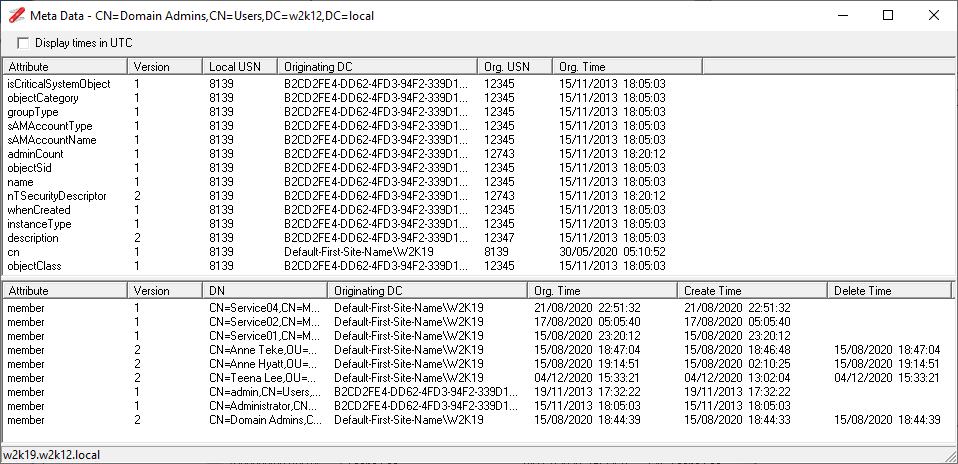
      To understand how NetTools is able to display this information, we need to look at the msDS-ReplValueMetaData attribute for the group. This attribute contains the details of the metadata for each value of an attribute for the object. We can view the details of the attribute in the Meta Data dialog, which can be opened from the AD Properties dialog using the Meta Data button or from the various context menus within Nettools.

      Here is the Meta Data dialog for the same group shown above, the top section of the dialog shows the details of the msDS-ReplAttributeMetaData attribute used to store the replication details for the attributes of the object, the lower section shows the meta data details from the msDS-ReplValueMetaData attribute showing the replicated values for attributes that have Object (DN-DN) data types, i.e. member.

      In this example you can see the list of changes that have be made to the member’s attribute of the object, each change to the member attribute is listed as a separate line, the line includes a Originated, Create and Delete time columns.  The Create and Delete columns are used to record when an item was added or removed from the attribute.  When an item is added, only the created time is populated, and then when the item is subsequentially removed both the create and delete times are set. The created time still exists to ensure that the AD replication is consistent.  NetTools AD Properties dialog will enumerate the msDS-ReplValueMetaData entries and display the entries that have the deleted time set in the Removals section of the Member tab.

      Also See:
      NetTools Basics
      NetTools AD Properties Dialog
      How Group Changes Works
      Display when members were added or removed from a group