Category Archives: HowTo

How To Edit an AD object’s Permissions

Features shown in this post are only available in NetTools v1.31.6 and above.

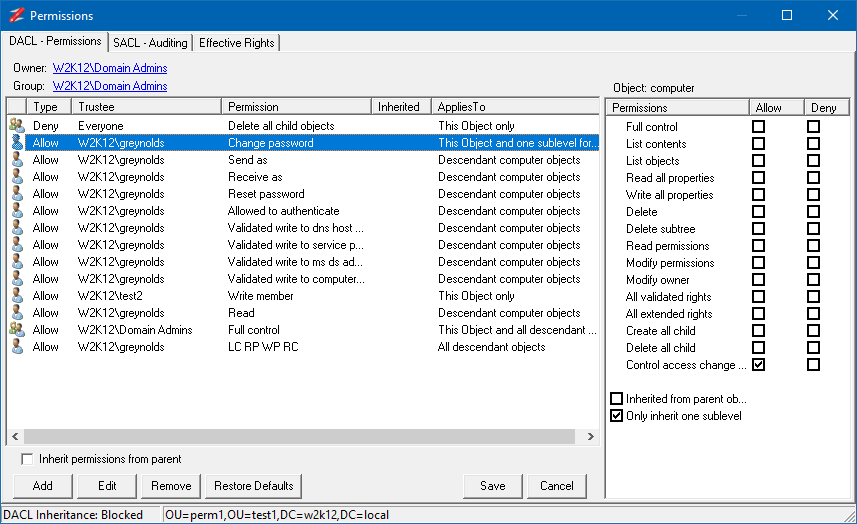
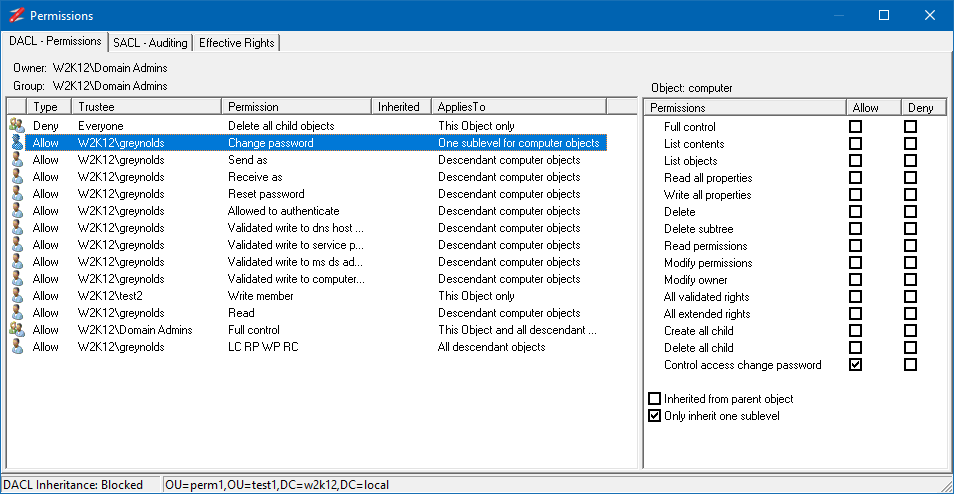
NetTools allows editing the permissions of the objects in Active Directory.  An object's permissions can be edited from the Permissions dialog, which provides similar functionality to the ADUC permissions dialog, but provides more control over the permission configuration than the native tools.  The Permissions dialog is accessed via the Permissions options on the context menu, which is available throughout NetTools.

Permissions dialog

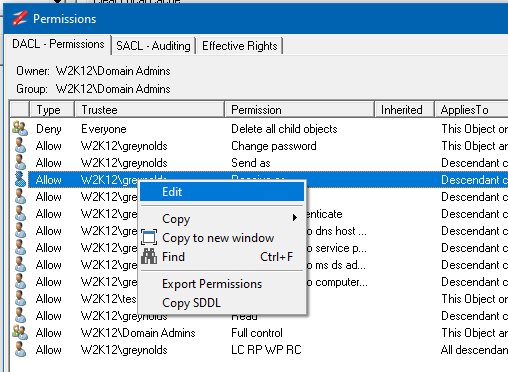
By default, the Permissions dialog opens in read-only mode.  To enable editing of the permissions, right-click on the list of permissions and select Edit from the context menu.  Once selected, the edit control bar is displayed at the bottom of the permissions list.

Edit Permissions
Edit Permissions

The buttons on the edit control bar allow you to add, edit, and remove permissions.  The Restore Defaults button, will restore the default permissions for the object, as defined in the schema for the object.  The Inherit permissions from parent option allow block inheritance from the parent object, when unselected, you are presented with the option to copy the existing inherited permissions.

It is possible to update both the DACL or SACL permissions of an object, but you can only edit one at a time, you must save or cancel any edits before editing the other permissions on the other tab.

If the Permissions dialog is opened not based on an AD object and the status bar doesn't display the DN of the object, then the Save and Restore Defaults buttons are not displayed, this allows you to modal the permissions but not save them.

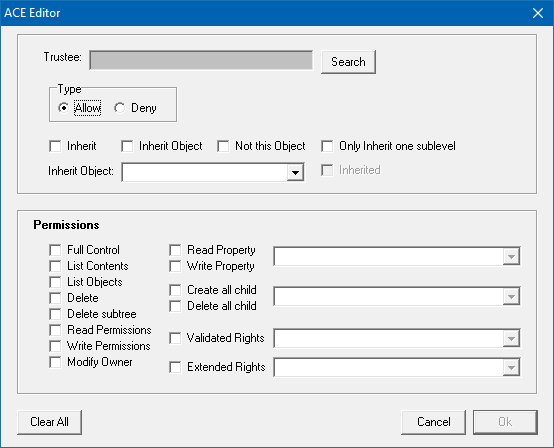
The following dialog is shown when adding new permission or editing existing permission:

Add or Edit Permissions

The top part of the dialog is used to select the trustee, the access type, and how the permissions are inherited, and the lower section specifies the permissions that will be set.

The edit permissions can be used in conjunction with the Effective Rights tab to model the permissions.
How To Read the contents of Registry.pol files

The registry.pol files are used to store Group Policies settings, these files typically exist in the Group Policy Template (GPT) which is hosted in the sysvol share on the domain controllers, but can also exit on local systems.

GPO settings in the Registry.pol files are saved in a binary format, and the normal AD GPO management tools don't provide a method to show the contains of these files.  NetTools v.1.31.3 and above includes an option to be display the contents of these files.

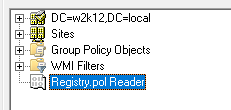
This option exists under the GPO Explorer option, once the Refresh button has been clicked the GPO details are displayed. The Registry.pol Reader option is the last option in the left hand pane.

Registry.pol Reader

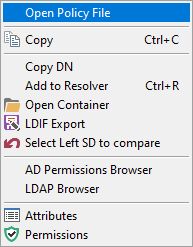
To open a registry.pol file, right click on the Registry.pol Reader entry and select Open Policy File option from the context menu.

GPO Explorer Context Menu

Select the file using the file browser, once the file is selected the contents of the file are displayed in the right hand pane.  This view uses the same navigation as with the Settings tab for a policy.

Registry.pol Reader - Settings

Note: NetTools is a 32 bit application, and when accessing the system32 folder on the local system drive, wow64 will be used when browsing system directories and as a result, some files that you expecting to find, might not be shown in the file browser dialog.  If this happens, using file explorer, copy the file from the system directory to non-system directory i.e. c:\temp and try again.

How To Delegate Windows DNS Policies

DNS Policies were introduced in Windows 2016 and provide the ability to define policies or rules that controls the results that are returned by the DNS server.  This functionality can be used to implement:

  • High availability of DNS services
  • Traffic management
  • Split-brain DNS
  • Redirection based on date/time

Unlike other DNS services DNS Policies can only be managed by Domain Admins, in this article we look at what changes need to be made to allow DNSAdmins to be able to manage DNS Policies.

Normally the DNSAdmin group provides rights to manage DNS services, however, it appears these permissions haven't been extended fully to the DNS Policies.  The configuration details for the DNS Policies are saved in the AD and the local registry of the DNS server.  While DNSAdmins have rights to the AD, the group has not been grant rights to registry to be able to create DNS Polcies.

To be able to delegate permissions to the DNSAdmins group, you will need to update the registry with additional permissions for DNSAdmins.

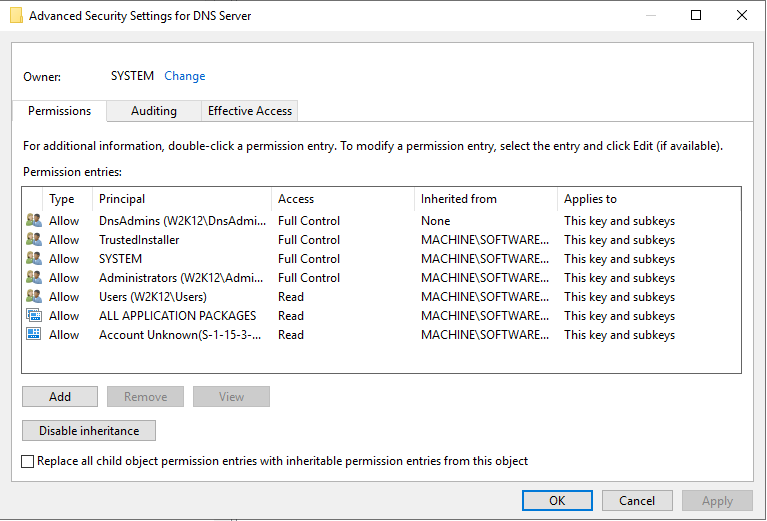
Open Regedit and navigate to 'Computer\HKEY_LOCAL_MACHINE\SOFTWARE\Microsoft\Windows NT\CurrentVersion\DNS Server' On the Permissions for the DNS Server key, and add DNSAdmin full control.

This screenshot shows that the DNSAdmins group has been granted the extra rights.

DNS Policies - Registry Permissions

How To Delegate Object Restoration Rights

In this post we will look at how to delegation the restoration of deleted objects using the AD Recycle Bin.

First we need to enable AD Recycle Bin, this is enabled by default on newly built forests with DC of Windows 2012 and above, for older forests all the domain controllers must be Windows 2008 R2 and above and you will need to run this command from a PowerShell command prompt to enable AD Recycle Bin:

Enable-ADOptionalFeature 'Recycle Bin Feature' -Scope ForestOrConfigurationSet -Target <your domain>

By default only domain administrators have the rights to restore object that have been deleted, the following steps will delegate the ability to restore deleted objects to the members of the "Restore_Objects" group.

1.  Create an new AD group called 'Restore_Objects', the group can be a local, global or universal depending on your requirements

2.  Next we need to set restoration rights on the root of the domain, open a command prompt with Run As Administrator rights and run the following command:

dsacls dc=<your domain>,dc=<com> /g "restore_objects:ca;Reanimate Tombstones"
Root Permissions

3.  To be able to change the security on the Deleted Object container, we first need to take ownership of the container, from the same command prompt run the following command:

dsacls "CN=Deleted Objects,dc=<your domain>,dc=<com>" /takeownership

4.  Now we are owners of the Deleted Objects container we can update the permissions, first we will assign the delegation group the rights to list the contents of the Deleted Objects container and read the properties of the objects using the following command:

dsacls "cn=deleted objects,dc=<your domain>,dc=<com>" /g "restore_objects:LCRP"
Deleted Object Permissions

The permissions set so far provide the Restore_Objects group with the rights to restore objects and view the contents of the Deleted Objects container.  However, they can't restore objects yet, they also need write permissions to the properties of the objects that have been deleted in order to be able to restore them.

Depending on your requirements, you can assign the properties permissions at the root of the domain so the Restore_Objects members can restore any deleted object in the domain or you can limit the delegation to a particular OU or object type.

This is the command to assign the required permissions

dsacls "ou=<your ou>,dc=<your domain>,dc=<com>" /I:T /g "restore_objects:WPCC"

This shows the permissions assigned at the OU level:

OU Permissions

In this case the members of the Restore_Object group, will be able to see all the of the Deleted Object but will only be able to restore the objects that were deleted from Restore OU, unless they have been assigned Write All Properties (WP) and Create Child (CC) rights through other permissions.

To restore objects you can use the Restore Objects option in LDAP Browser, see How To Restore AD Deleted Objects for more details.

How To View the Permissions that will be assigned by the SDProp Process

This is a quick post to show how to display the permissions that will be assigned by the SDProp Process.

The SDProp process uses the AdminSDHolder container object as a template for the permissions that will be assigned to any users or groups that are protected by the SDProp Process. For more details on the SDProp Process see the SDProp Option.  The permissions assigned to the ADminSDHolder are used to replace the existing permissions when an object first comes into scope, or if the permissions of an existing in scope object are changed.

Using the NetTools Permission Browser option (formally - ACL Browser) is it very simple to view the permissions.  In the left hand pane navigate to the Access Control - Permissions Browser option.
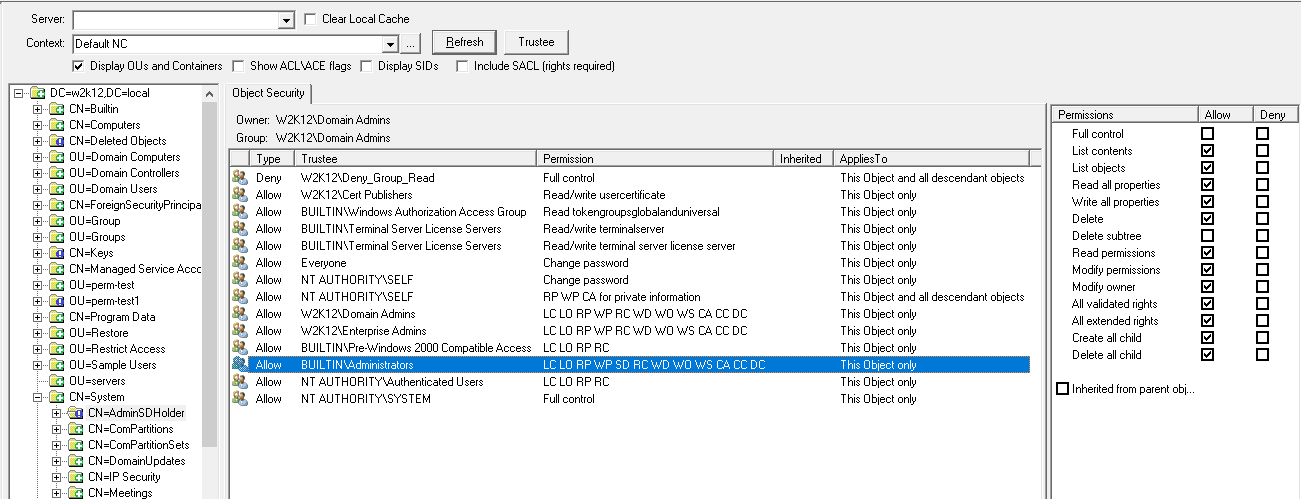
Click on the Refresh button, this will display the directory tree, navigate down the tree to CN=System, CN=AdminSDHolder.  With the AdminSDHolder object selected the permissions will be displayed in the middle pane:

AdminSDHolder Permissions

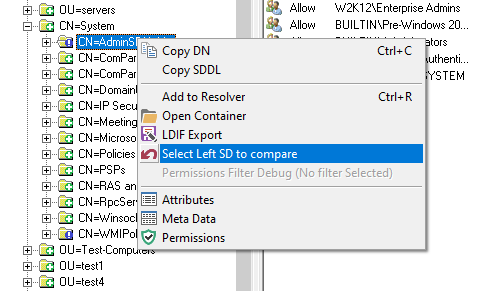
We can use the Permission Compare feature to confirm that the permissions have been applied to a protected object.  In the tree view of the Permissions Browser right click on the AdminSDHolder node and select Select Left SD to Compare

Select Left SD to Compare

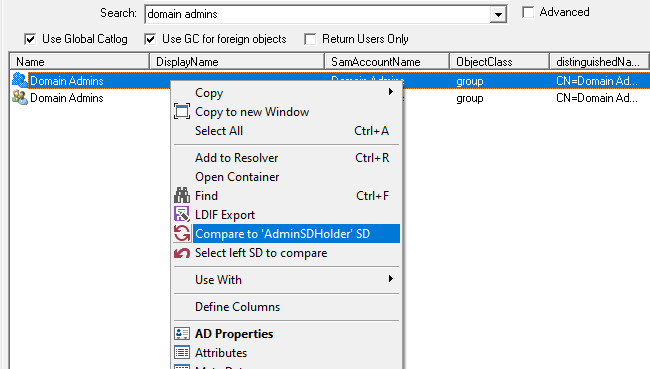
Using the Quick Search option we can search for a protected group i.e. Domain Admins.

Quick Search - Domain Admins

From the search results right click on the domain admins group and select Compare to 'AdminSDHolder' SD

Select Right Compare AdminSDHolder

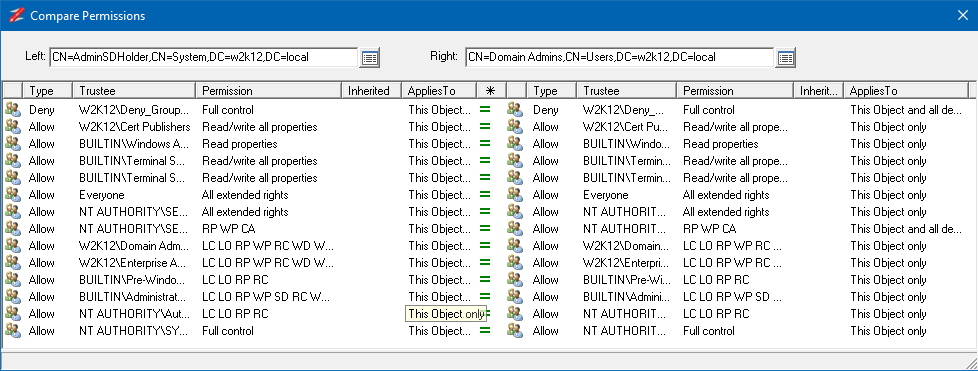
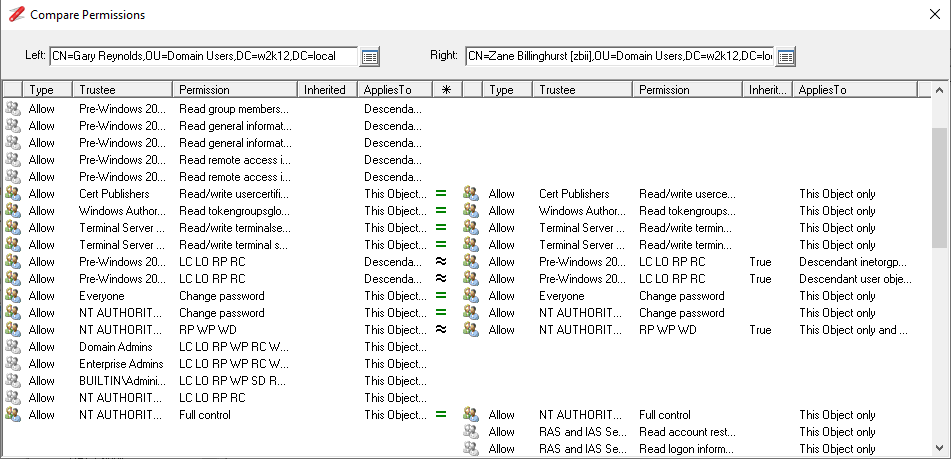
This will display the Compare Permissions dialog, allowing you to confirm that the AdminSDHolder permissions have been applied to the Domain Admins group, you can repeat these steps to confirm any of the users or groups that are protected by the SDProp process.

Compare Permissions - AdminSDHolder

How To Compare the Permissions of Two AD Objects

The permissions for a object in AD are stored in the ntSecurityDescriptor attribute, these permissions are used to control who can access the object.  When troubleshooting access issues, it is sometimes useful to be able to compare the permissions that are assigned to two different objects.  With v1.30.11 above there is now simple method to compare the permissions between two different objects.

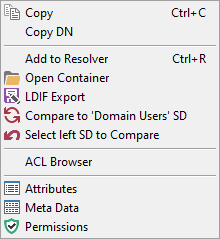
The context menu in NetTools now provides two additional menu items to allow permissions of objects to be compared:

  • Select left SD to compare
  • Compare to 'left object' SD
Compare Menu Items

To compare the permissions or security descriptors (SD), select the first object and select the Select left SD to compare option, this will set the object as the left items.  Then find the second object you want to compare against, and then select the Compare to 'left name' SD option and the compare Permissions dialog box will be displayed.

Compare Permissions

Compare two user objects

The easiest method to compare two user objects is use the quick search option to find the first user, enter the user name in the quick search box and press enter, in this case we are searching for greynolds.

Quick Search

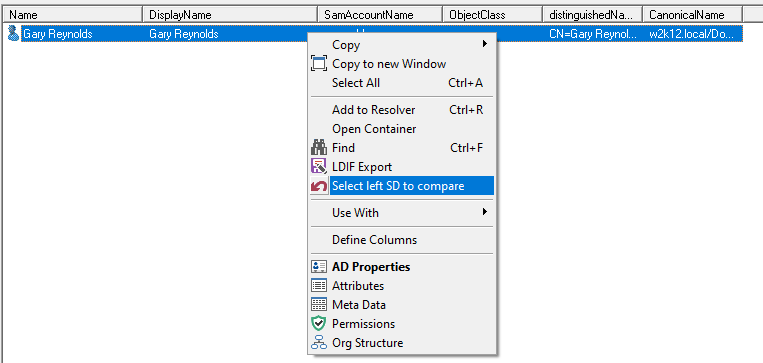
From the Search results, right click on the greynolds object and select the Select left SD to compare

Compare Left

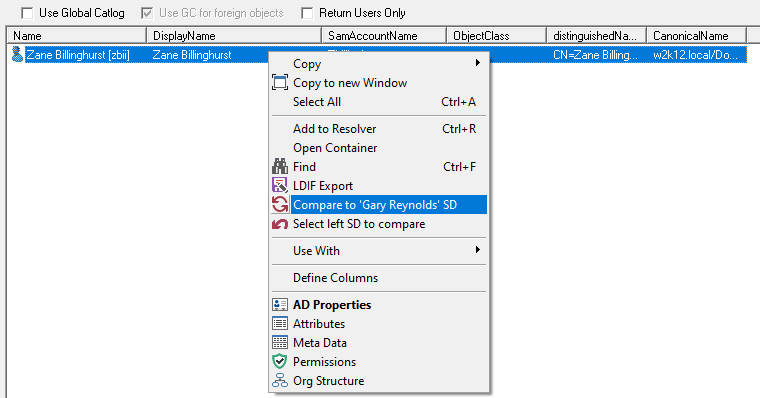
If we search for the second user object, and then right click on the second user and select the Compare to 'Gary Reynolds' SD menu item and the Compare Permissions dialog will be displayed.

Compare SD Item

The comparison between the two objects will be displayed.

Compare Permissions Result

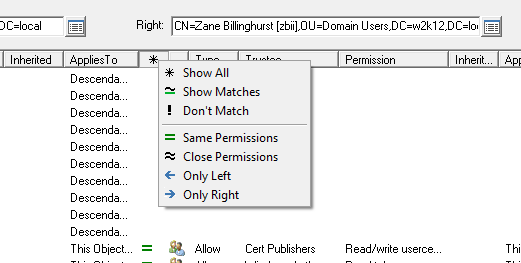
Click on the column header with a '*' to select options to filter the displayed ACEs.

Compare Permissions Options

Compare Other Objects

To compare objects other than users, use one of NetTools options to find the object you are looking for, i.e. LDAP Browser, LDAP Search, ACL Browser, GPO Explorer, etc.  all these options have the same context menus to allow to you to compare permissions against any other object.

See Comparing AD Permissions for more information

How To Import an AD Permissions Report Filter

The AD Permissions Reporter option provides the ability to export and import filters, this post provide details on how to import a filter.

This is a sample of a filter text

[Find Deny Permissions Assigned to a user]
Count=1
Options=18437
Rule1_Enabled=1
Rule1_Options=1280
Rule1_SDControl=0
Rule1_SDNotControl=0
Rule1_SDNullAcl=0
Rule1_Prompt=1
Rule1_Token=1
Rule1_Scope=12
Rule1_NotScope=0
Rule1_ACEType=2626
Rule1_ACEFlags=0
Rule1_ACENotFlags=0
Rule1_Perms=0
Rule1_NotPerms=0
Rule1_MatchRules=546

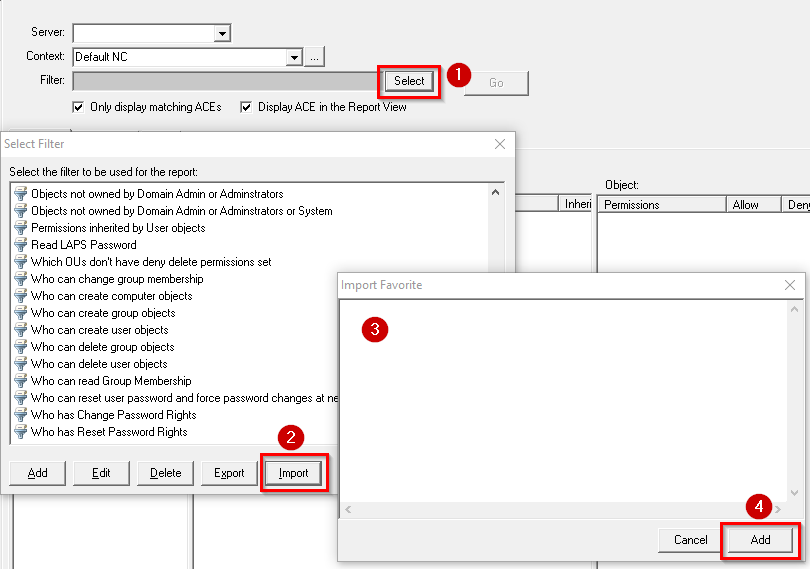
Here are the steps required to import the filter.

  1. Click on the Select button
  2. Click on the Import button
  3. Paste the filter into the dialog
  4. Click Add button
AD Permissions Reporter - Import Filter

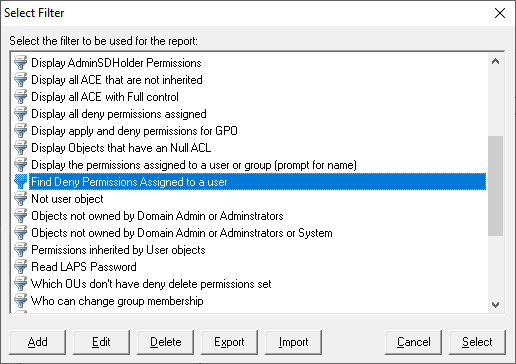
Once the filter is imported the list will be updated, now select the new filter from the list.

AD Permission Reporter - Select Filter

How To Test GPOs now GPOTool.exe is no longer available

Some of the feature shown are only available in NetTools v1.31.6 beta and above

Previously included in the Windows 2003 Resource Kit there was simple tool called GPOTool.exe, which checked the status of the GPOs in a domain, this would check the consistency of the details between the AD and Sysvol and highlight a number of common problems.  As Windows 2003 Resource kit is no longer available for download from Microsoft, and this functionality hasn't been incorporated into any of the existing tools, there is no easy way to confirm the status of the GPOs in a domain.

Under the GPO Explorer in NetTools there is a test option that performs a similar suite of tests that were performed by GPOTool.exe.  There are two methods to test the status of the GPOs, either at the individually GPO level or at the domain level to test all GPOs.

The test covers the following items:

  • AD Replication
  • Sysvol Replication
  • Mismatching of AD and Sysvol versions
  • Compare object counts for both AD and Sysvol
  • Sysvol gpt.ini exists
  • Trustees that have apply GPO rights have permissions in Sysvol

Test an Individual GPO

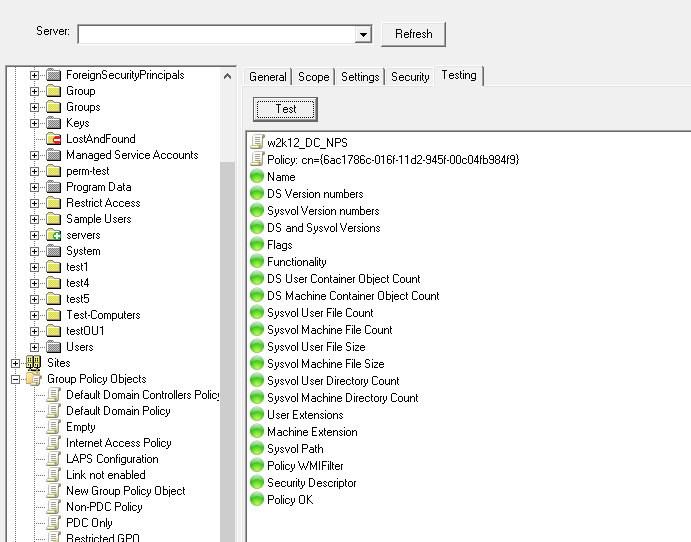
When selecting a GPO in the GPO Explorer an tab called Testing is shown with the details of the policy, which allows you to test the selected GPO.  By default, the test will be run against all Domain Controllers in the domain, however, you are able to select which domain controllers will be be included in the test.  This allows you to deselect domain controllers that might be at the end of a slow link or are offline temporarily.   The server selection is on the test all GPO screen, see below.

GPO Testing Results - Individual

Test All or multiple GPOs at once

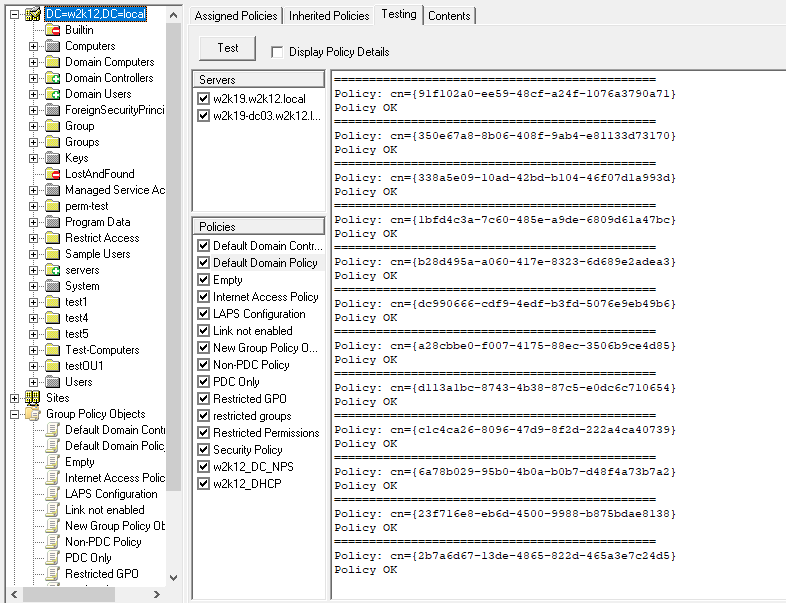
This option is found by select the root of the domain in the left hand pane, the Testing tab displays the domain controllers and GPOs in the domain.  The lists can be used to select which servers and GPOs will be included in the test .  The test provides to those who have used GPOTool.exe before, with a touch nostalgia, as the output is pretty must the same as GPOTool.exe.

GPO Testing Results

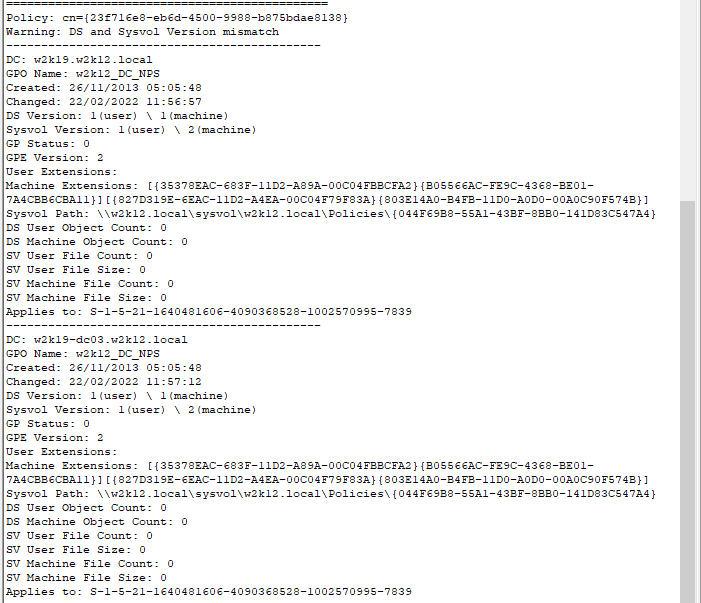
If an issue is found with the policies, the details of the policies on all domain controllers is displayed, or if Display Policy Details options is selected.

Failed Results

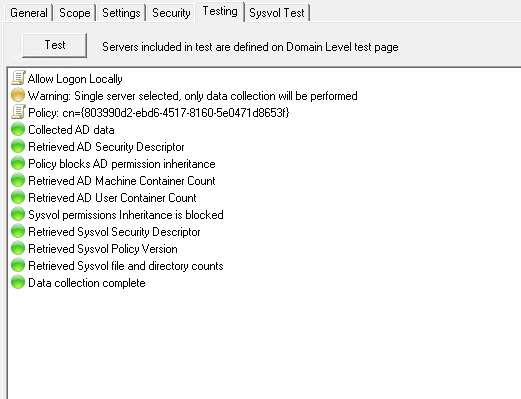
The Testing option is intended to check that the policies are replicated correctly between the domain controllers in the domain.  If the domain has a single domain controller or only a single domain controller is selected, then the test will only complete the data capture phase against the selected DC, and will display the results of the data capture and provide a warning that only one domain controllers has been selected.

GPO Test - Single DC Results

See GPO Explorer - GPO Test Details for more details on the test that are performed.

How To Display the RootDSE of an AD Domain Controller

In this post we will look at how to display the RootDSE of a domain controller using NetTools.

RootDSE is the root of the directory tree on a directory server. The rootDSE provides information about the directory server, and the details of the features and options that the server supports.

With NetTools it is a simple task to display the RootDSE, In NetTools if you navigate to the LDAP Search option.

To retrieve the RootDSE entry the name of the domain controller in the server field, ensure that the Base DN field is blank and then click on the Show Attributes for DN button.

Display RootDSE

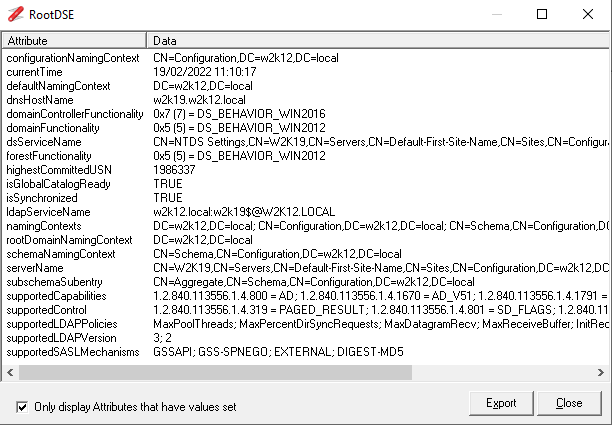
This RootDSE will be displayed as shown below.

Attributes - RootDSE

How To Find Assigned Permissions in AD (v1.30.8+)

In this post we will look at how to find where a user or group have been assigned permissions in the AD, this is based on NetTools v1.30.8 or later.  For details using NetTools v1.30.7 or earlier see this post.

For this task we will use the AD Permissions Reporter option in NetTools, which will allow us to search the entire domain or a specific OU structure and report on any permissions that are assigned to the specified user or group.  As this will search every object in the AD, it's best to run this on a server or workstation that is on the same network segment as the Domain Controller, or on the Domain Controller itself.

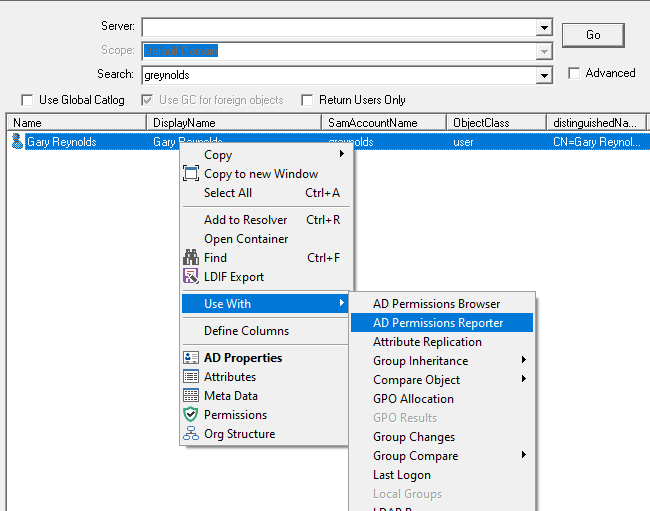
First we need to find the user or group we are interested in, in the Quick Search box enter the name of the user or group and click the search button.  In this case we are searching for the user called greynolds.

Quick Search

The results of the search will be displayed in the User Search option, right click on the correct user or group from the list, and select Use With -> AD Permissions Reporter from the context menu.

Find Permissions

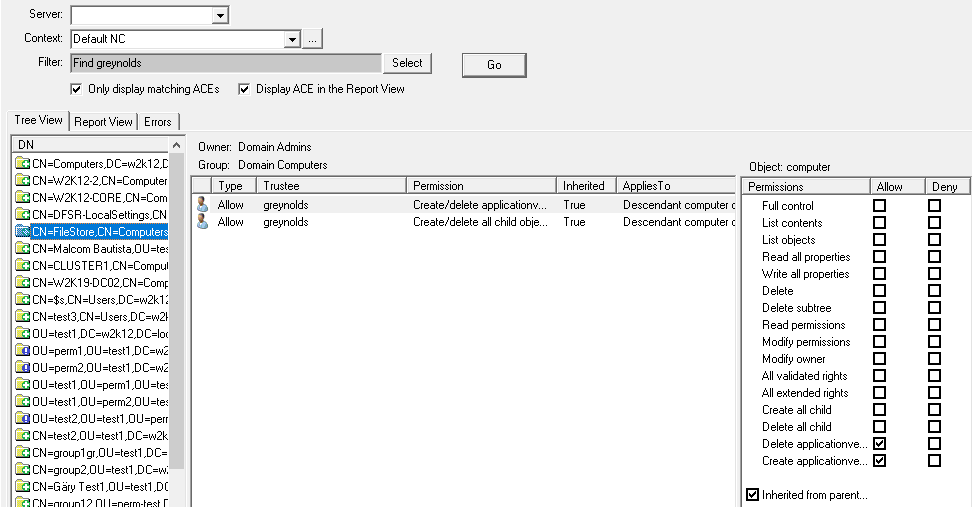
NetTools will switch to the AD Permissions Reporter option and start searching for selected user or group in AD.  Depending on the size of your AD this might take a while as it will read the permissions of every object in the domain context.  Once the search is complete all the objects that user or group have been assigned direct permissions will be displayed.

Find User's Permissions

By clicking on one of the objects listed in the left results pane you can view the permissions that have been assigned to the user or group.

It's also worth completing a search of the Configuration partition in case permissions have been assigned there as well.  This can be done by changing the Context field to Configuration NC and pressing Go.